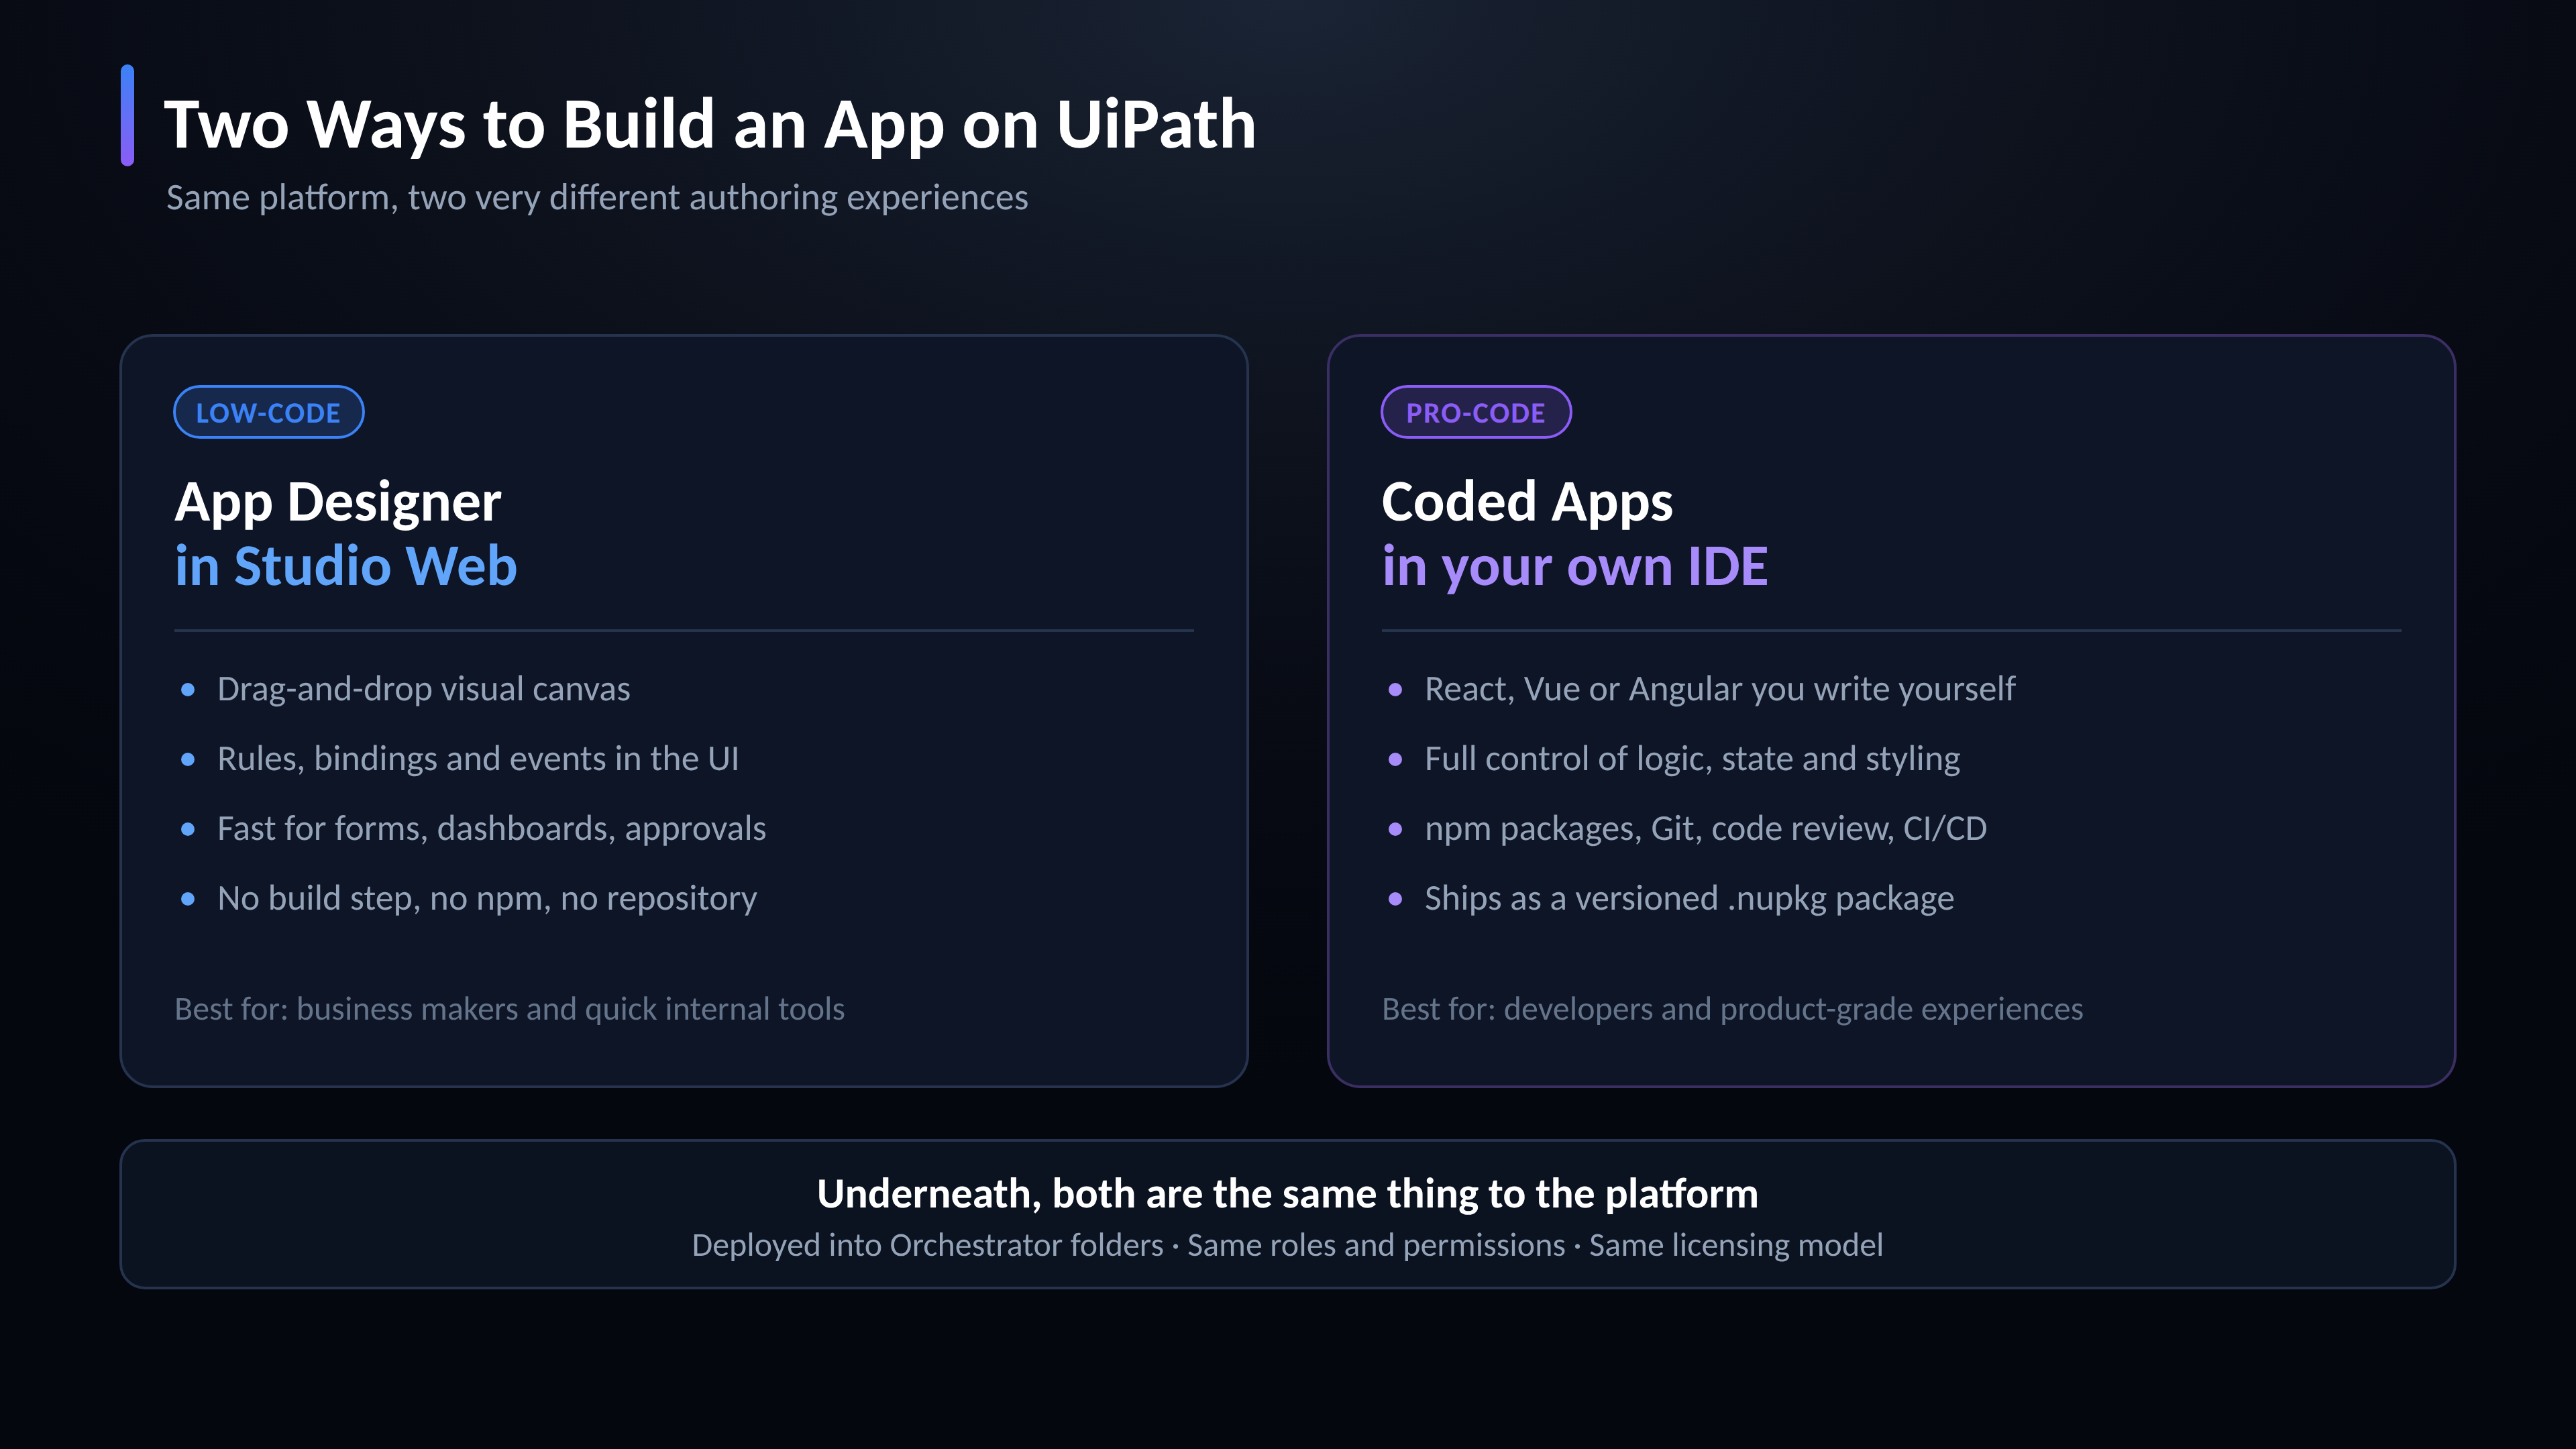
UiPath Coded Web Apps: A Hands-On Guide for Developers
What they are, why they exist, and how I built and deployed a real one end to end
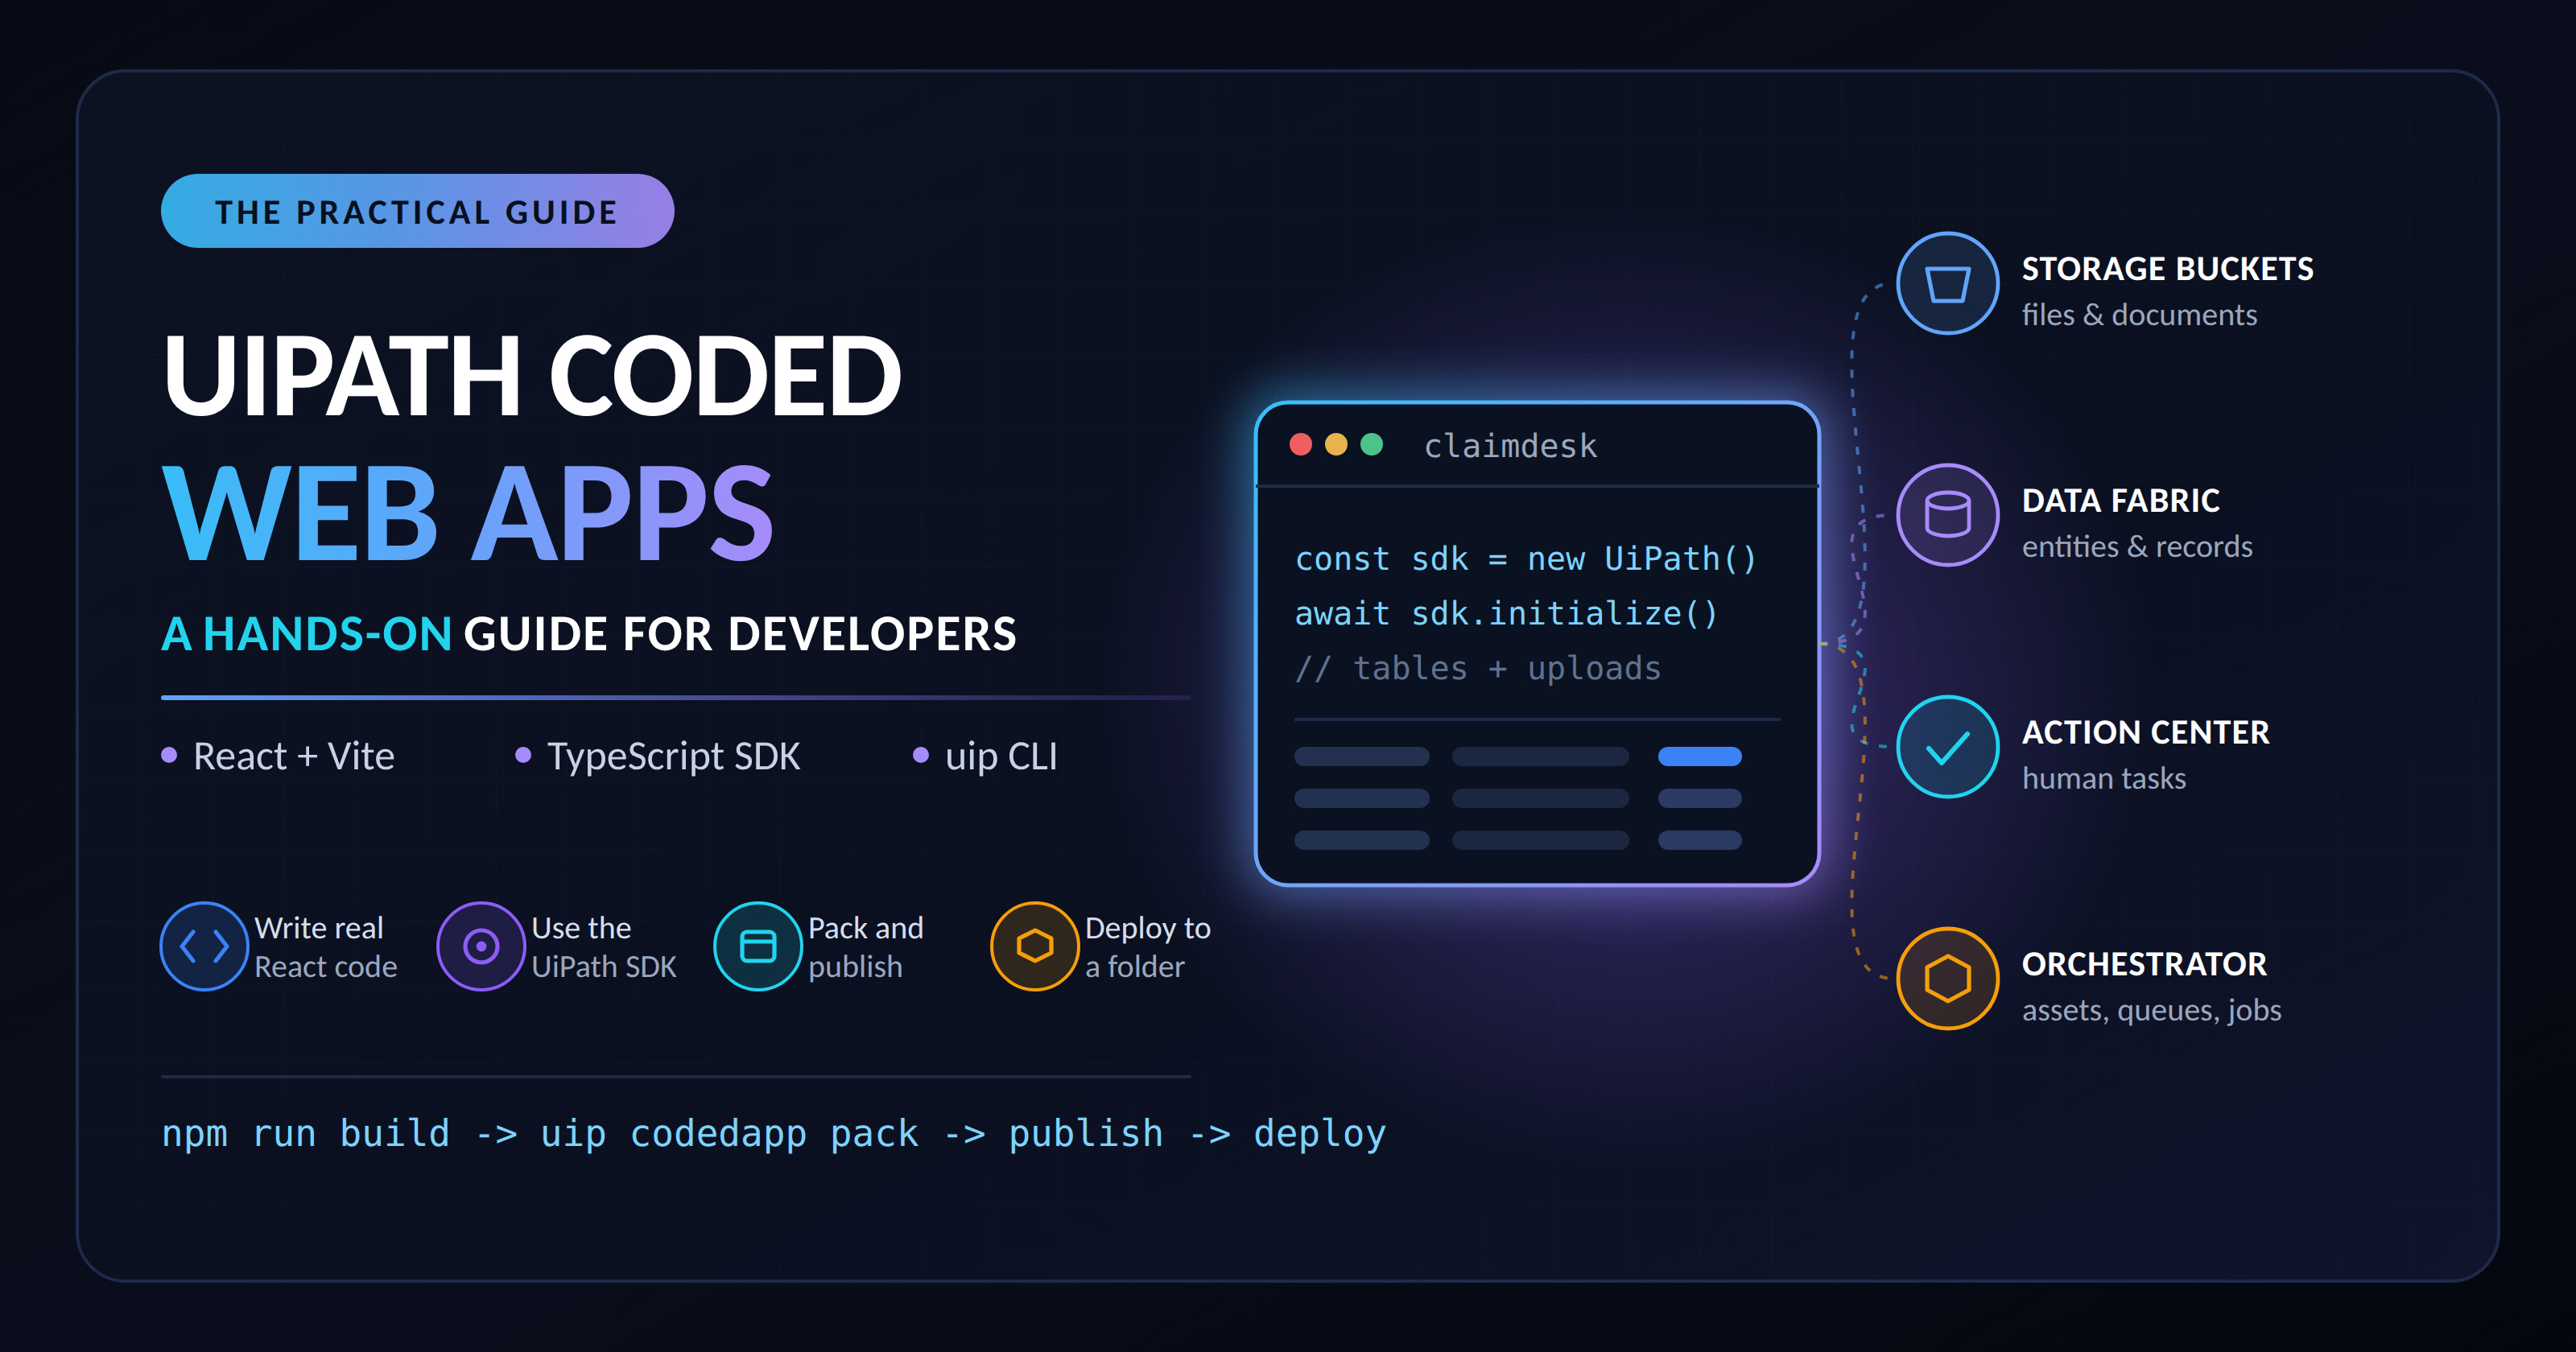
1. Where I Started: The Gap I Kept Hitting
I spend most of my time around automation. Processes, agents, queues, human-in-the-loop approvals. And for a long time, whenever a workflow needed a screen, I reached for the App Designer in Studio Web. Drag a table, bind a field, add a rule, publish. For a lot of internal tools, that is genuinely the right answer.
But every few months I hit the same wall.
ℹ️ The Wall | "Can we have a side-by-side PDF and form?" "Can this grid do inline edit with optimistic updates?" "Can we reuse our design system?" "Can this go through our normal code review and CI pipeline?" |
These are not exotic requests. They are the kind of thing any front-end developer solves before lunch. But they are exactly the point where a visual designer starts fighting you, because a visual designer is optimised for speed and consistency, not for arbitrary control.
That is the gap UiPath Coded Apps fills. And once I understood it, a whole category of "we can't build that in Apps" conversations went away.
This article is my working notes, cleaned up. I'll cover what Coded Apps are, why they exist, what they can do, and then we'll build and deploy a real one together — a small claims-intake app I call ClaimDesk, with the full source.
2. What Is a UiPath Coded App?
Here is the shortest honest definition I can give:
A Coded App is a normal browser-based web application that you write in your own IDE, which UiPath hosts for you and connects to the automation platform.
That's it. No proprietary component model. No visual canvas. It is React, Vue, Angular, Svelte, or plain JavaScript — whatever you already know.
The official documentation describes it as a way to build and deploy browser-based web applications within UiPath, built through direct code development in a developer's preferred IDE, giving developers complete control over app logic, behavior, and integration with external systems.
Three things make it a UiPath app rather than just a website:
A TypeScript SDK (
@uipath/uipath-typescript) that handles sign-in and gives you a typed client for Orchestrator, Data Fabric, Action Center and more.A CLI (
uip codedapp) that packages your built files into a standard.nupkgand deploys it into an Orchestrator folder.Managed hosting on a dedicated static-site domain, so you never provision a server.
Deployed apps are served from https://<orgName>.uipath.host/<appName>. UiPath uses a separate uipath.host domain because Coded Apps is a static-site hosting service distinct from the main product site, which gives every organization a predictable, account-scoped URL scheme.
One important constraint before you get excited: Coded Apps are Automation Cloud only. Automation Suite and Dedicated deployments are not supported at this time.
3. Why Coded Apps Are Needed
When I explain this to teams, I usually frame it as three separate problems that all landed at once.
Problem 1: The UI is sometimes the product
In a lot of automation projects the screen is an afterthought — a form to kick off a job. But in others, the screen is the value. A validation console. An exception triage desk. A reconciliation workbench. When the interface is where the work actually happens, "good enough" UI becomes a real cost.
Problem 2: Developers were locked out of their own tooling
Front-end teams have a stack: a component library, Storybook, unit tests, ESLint, Git branching, pull requests, CI. A visual designer discards all of it. Coded Apps put that stack back on the table — because your app is just an npm project with a dist/ folder.
Problem 3: Building it outside UiPath created a second problem
You could always host a React app yourself on Azure or Vercel and call the UiPath APIs. But then you own the hosting, the TLS certificates, the OAuth dance, the token refresh, the CORS config, the firewall rules, the deployment pipeline, and — most painfully — a permission model that lives outside Orchestrator and drifts from it.
Coded Apps remove that second problem. You write the app; the platform handles identity, hosting, and governance.
And on cost: building and deploying a coded app has no per-app licensing charge. The number of apps you build, deploy or redeploy doesn't affect license consumption — consumption is tied to the user who accesses the app, based on the license that user holds.
4. Low-Code Apps vs Coded Apps: How I Choose
This is the question I get asked most, so let me be blunt about it.!
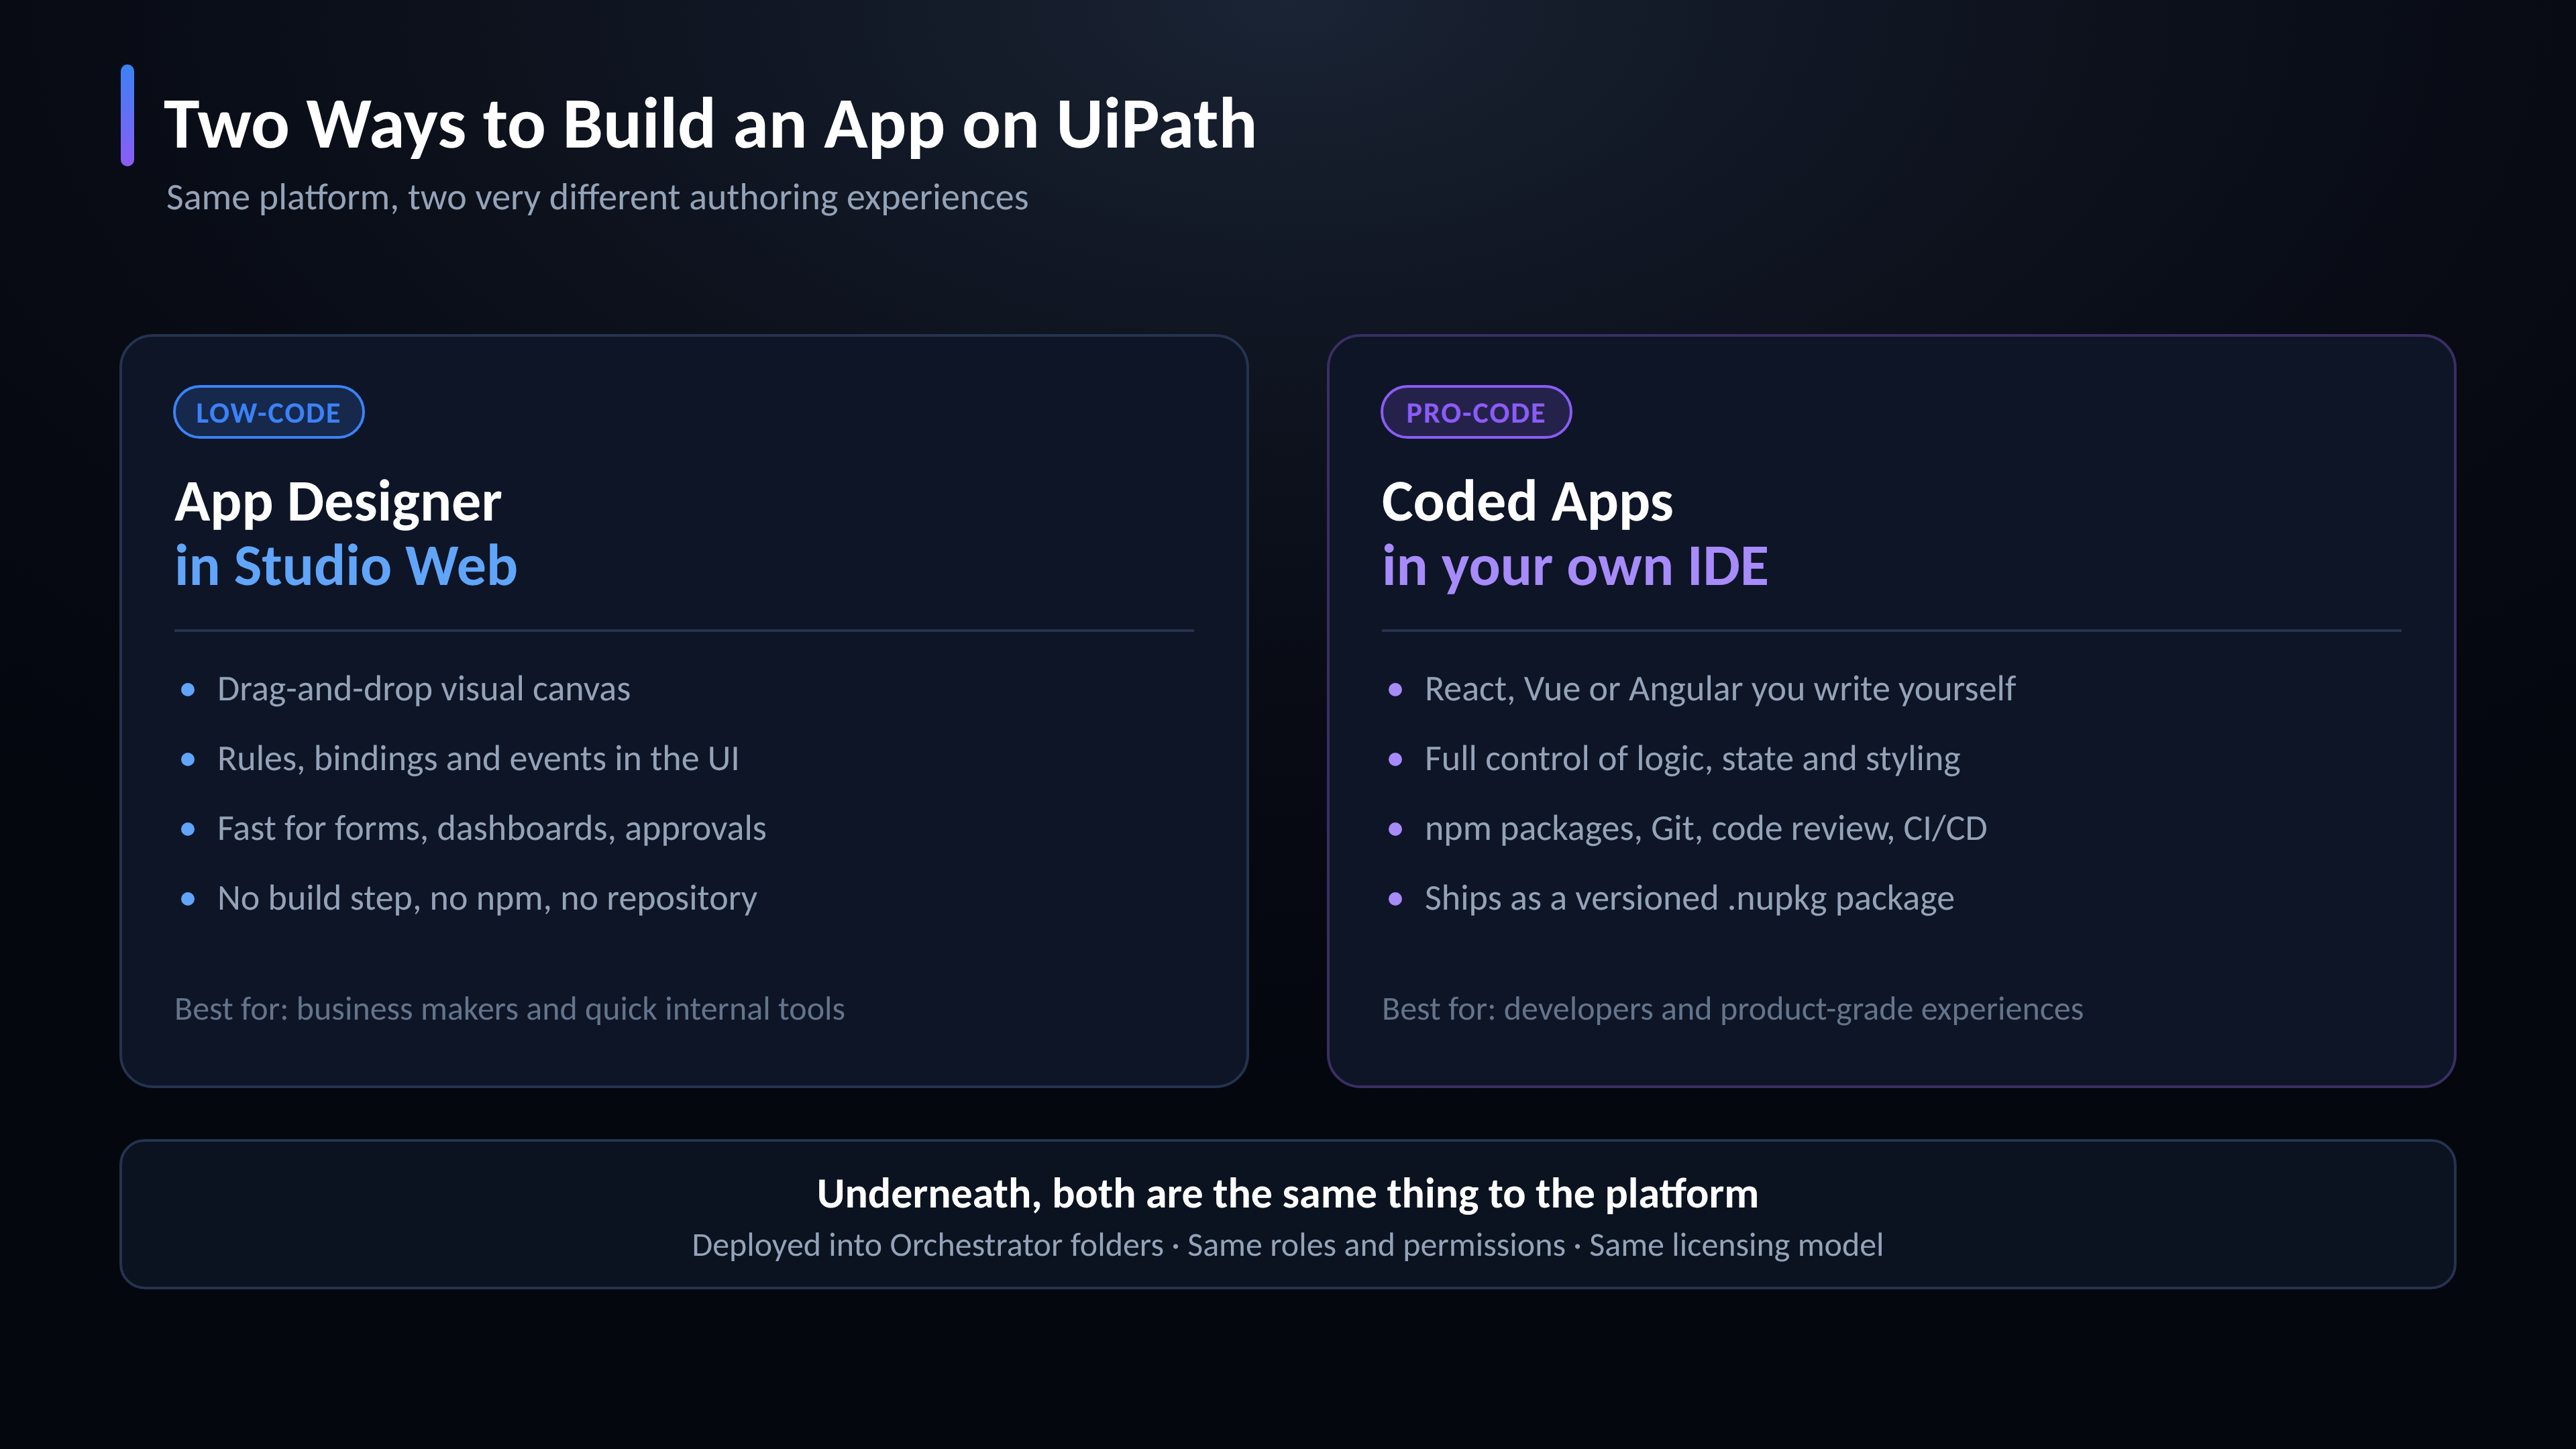

Both authoring styles produce a UiPath App that lives in an Orchestrator folder. Only the authoring experience differs.
My rule of thumb:
| Reach for App Designer when… | Reach for Coded Apps when… |
|---|---|
| The screen is a form, a list, or a simple dashboard | The screen has real interaction logic or custom visualisation |
| A business maker will maintain it | A developer will maintain it |
| You want it live this afternoon | You want it in Git, reviewed and tested |
| Standard UiPath look and feel is fine | You need your own design system or brand |
| No npm, no build, no repository is a feature | npm, build and repository are the point |
The mistake I see is treating this as a hierarchy — "coded is the advanced one." It isn't. A five-field approval form built as a Coded App is a self-inflicted maintenance burden. Choose by who maintains it and how much the UI actually matters.
5. Anatomy of a Coded App
Before writing any code, it helped me enormously to hold a mental picture of what is actually running where.
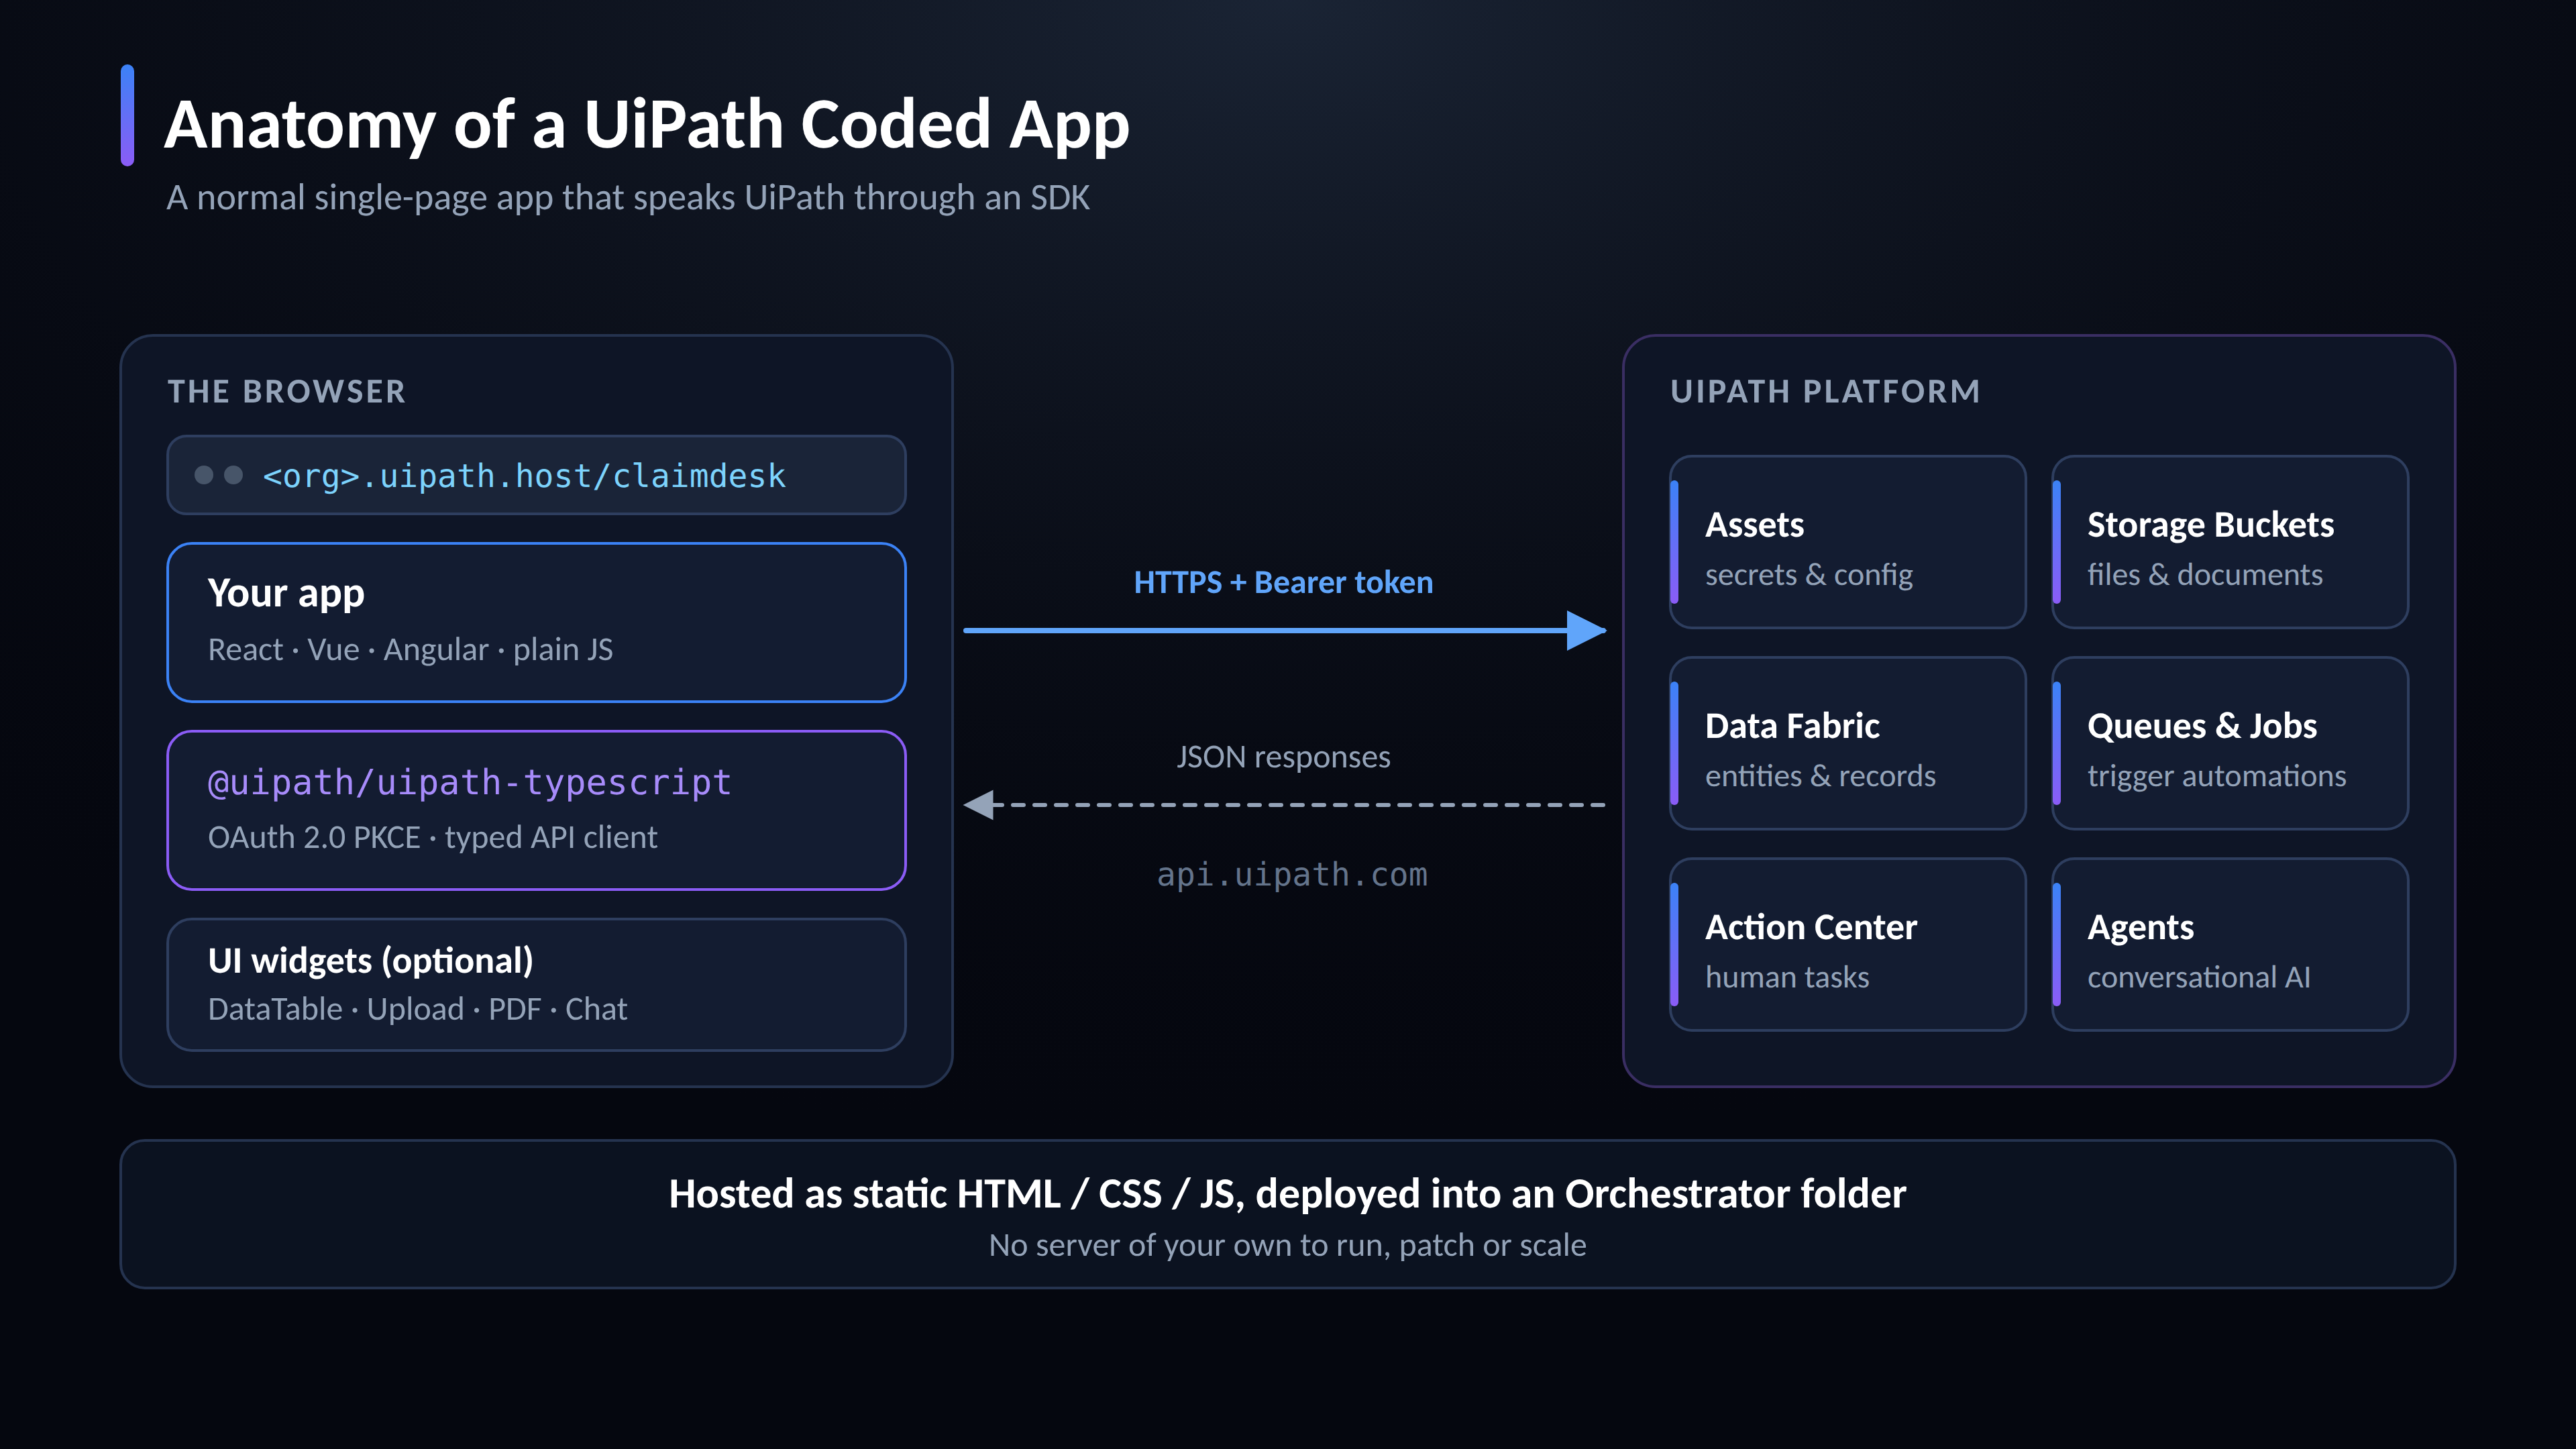

Your app runs entirely in the browser. The SDK holds a token and calls the platform APIs directly.
Three pieces to internalise:
The browser side. Your compiled HTML, CSS and JavaScript are served as static files. Inside that bundle sits @uipath/uipath-typescript, which performs an OAuth 2.0 authorization-code flow with PKCE, holds the resulting access token, and exposes typed services.
The wire. Everything the app does at runtime is an HTTPS call to api.uipath.com with a bearer token. There is no middle-tier server of yours in the path.
The platform side. The SDK gives you services for Assets, Storage Buckets, Data Fabric Entities, Queues, Jobs, Processes, Action Center Tasks, Maestro, Conversational Agents and more.
Two domains need to be allowlisted in your firewall for this to work:
| Description | Domain |
|---|---|
| Host path for coded apps | <orgname>.uipath.host |
| API domain for coded apps | api.uipath.com |
6. The Features That Actually Matter
Let me go through the capabilities one by one, with what each is genuinely useful for.
6.1 Any framework you like
React, Vue, Angular, or plain JavaScript. The platform only needs a folder of static files with an index.html entry point. The prerequisites are modest: Node.js 20.x or higher and npm 8.x or higher.
6.2 The TypeScript SDK
This is the heart of it. Initialisation takes no constructor arguments at all, because the SDK reads its configuration from meta tags the platform injects:
import { UiPath } from '@uipath/uipath-typescript/core'

const sdk = new UiPath()
await sdk.initialize()
After that you have typed access to platform resources. A few illustrative calls:
// Read a configuration value from Orchestrator Assets
const asset = await sdk.assets.getByName('ApiEndpoint')

// Upload a document to a storage bucket
await sdk.buckets.uploadFile({ /* … */ })

// Read records from a Data Fabric entity
const records = await sdk.entities.getAllRecords(entityId)

// Start a process
await sdk.processes.start({ /* … */ })

// Fetch an Action Center task
const task = await sdk.tasks.getById(taskId)
Every one of those maps to a specific OAuth scope, which matters a lot in practice. Here are the ones we'll use:
| SDK method | Required scope |
|---|---|
buckets.uploadFile() |
OR.Buckets |
buckets.getAll() / getById() |
OR.Buckets or OR.Buckets.Read |
entities.getById() |
DataFabric.Schema.Read |
entities.getAllRecords() |
DataFabric.Data.Read |
entities.updateRecord() |
DataFabric.Data.Write |
assets.getByName() |
OR.Assets or OR.Assets.Read |
processes.start() |
OR.Jobs or OR.Jobs.Write |
6.3 Ready-made UI widgets
This one surprised me. UiPath publishes a set of open-source React widgets built on uipath-typescript and the apollo-wind design system, so you don't have to build the obvious things from scratch:
| Package | What it gives you |
|---|---|
@uipath/ui-widgets-datatable |
An ag-Grid table with full CRUD, master-detail views, inline editing, filtering, sorting, pagination and foreign-key support |
@uipath/ui-widgets-multi-file-upload |
Multi-file selection and upload straight into a storage bucket, with type filters, size limits and success/error callbacks |
@uipath/ui-widgets-pdf-viewer |
Renders PDFs from storage buckets, entity attachments or plain URLs; the pdf.js worker ships inside the package, so it works behind strict CSP and firewalls |
@uipath/ui-widgets-validation-station |
A React wrapper around the Document Understanding Validation Station |
@uipath/ui-widgets-conversational-agent-chat |
A chat surface backed by UiPath Conversational Agents, with streaming responses and history |
@uipath/ui-widgets-external-auth |
Provider-agnostic sign-in buttons with built-in OIDC redirect (CSRF state + PKCE) for providers like Google |
We'll use two of these in ClaimDesk. It cut the build time down enormously.
6.4 OAuth handled for you
You register a non-confidential external application in your org, put its client ID in uipath.json, and the SDK does the rest — the redirect, the code exchange, the token storage, the refresh. You never write auth code.
6.5 Managed static hosting
No servers, no containers, no certificate renewals. You hand the platform a dist/ folder and it publishes it.
6.6 Real governance
This is the part that makes it enterprise-viable rather than a toy. A Coded App is deployed as a UiPath App inside Orchestrator folders, and once integrated it follows the same governance principles as a standard UiPath App. Same folders. Same roles. Same permissions. Same audit surface.
6.7 A proper CLI and CI/CD story
The uip CLI manages the full deployment lifecycle, and every flag can also be supplied as an environment variable — UIPATH_URL, UIPATH_ACCESS_TOKEN, UIPATH_ORGANIZATION_NAME and friends — which is exactly what you need for a GitHub Actions pipeline. For automated deploys you authenticate with a confidential external app using --client-id and --client-secret, rather than the interactive browser login you'd use locally.
6.8 Studio Web solutions
Coded Apps can also be initialised inside a Studio Web Solution, alongside RPA workflows and agents. In that model Studio Web owns identity, versioning and the publish lifecycle, while the source is still authored in your local IDE and pushed up with uip codedapp push. Studio Web scaffolds a webAppManifest.json; if the app needs UiPath resources at runtime, a bindings_v2.json file declares them. Note that pushed source is read-only in the browser — there is no in-browser editor or live preview.
6.9 Coded Action Apps
The same technology, pointed at Action Center. More on this in section 11.
7. The Lifecycle: From Local Code to a Live App
Six steps, and after the first time it takes about ninety seconds.
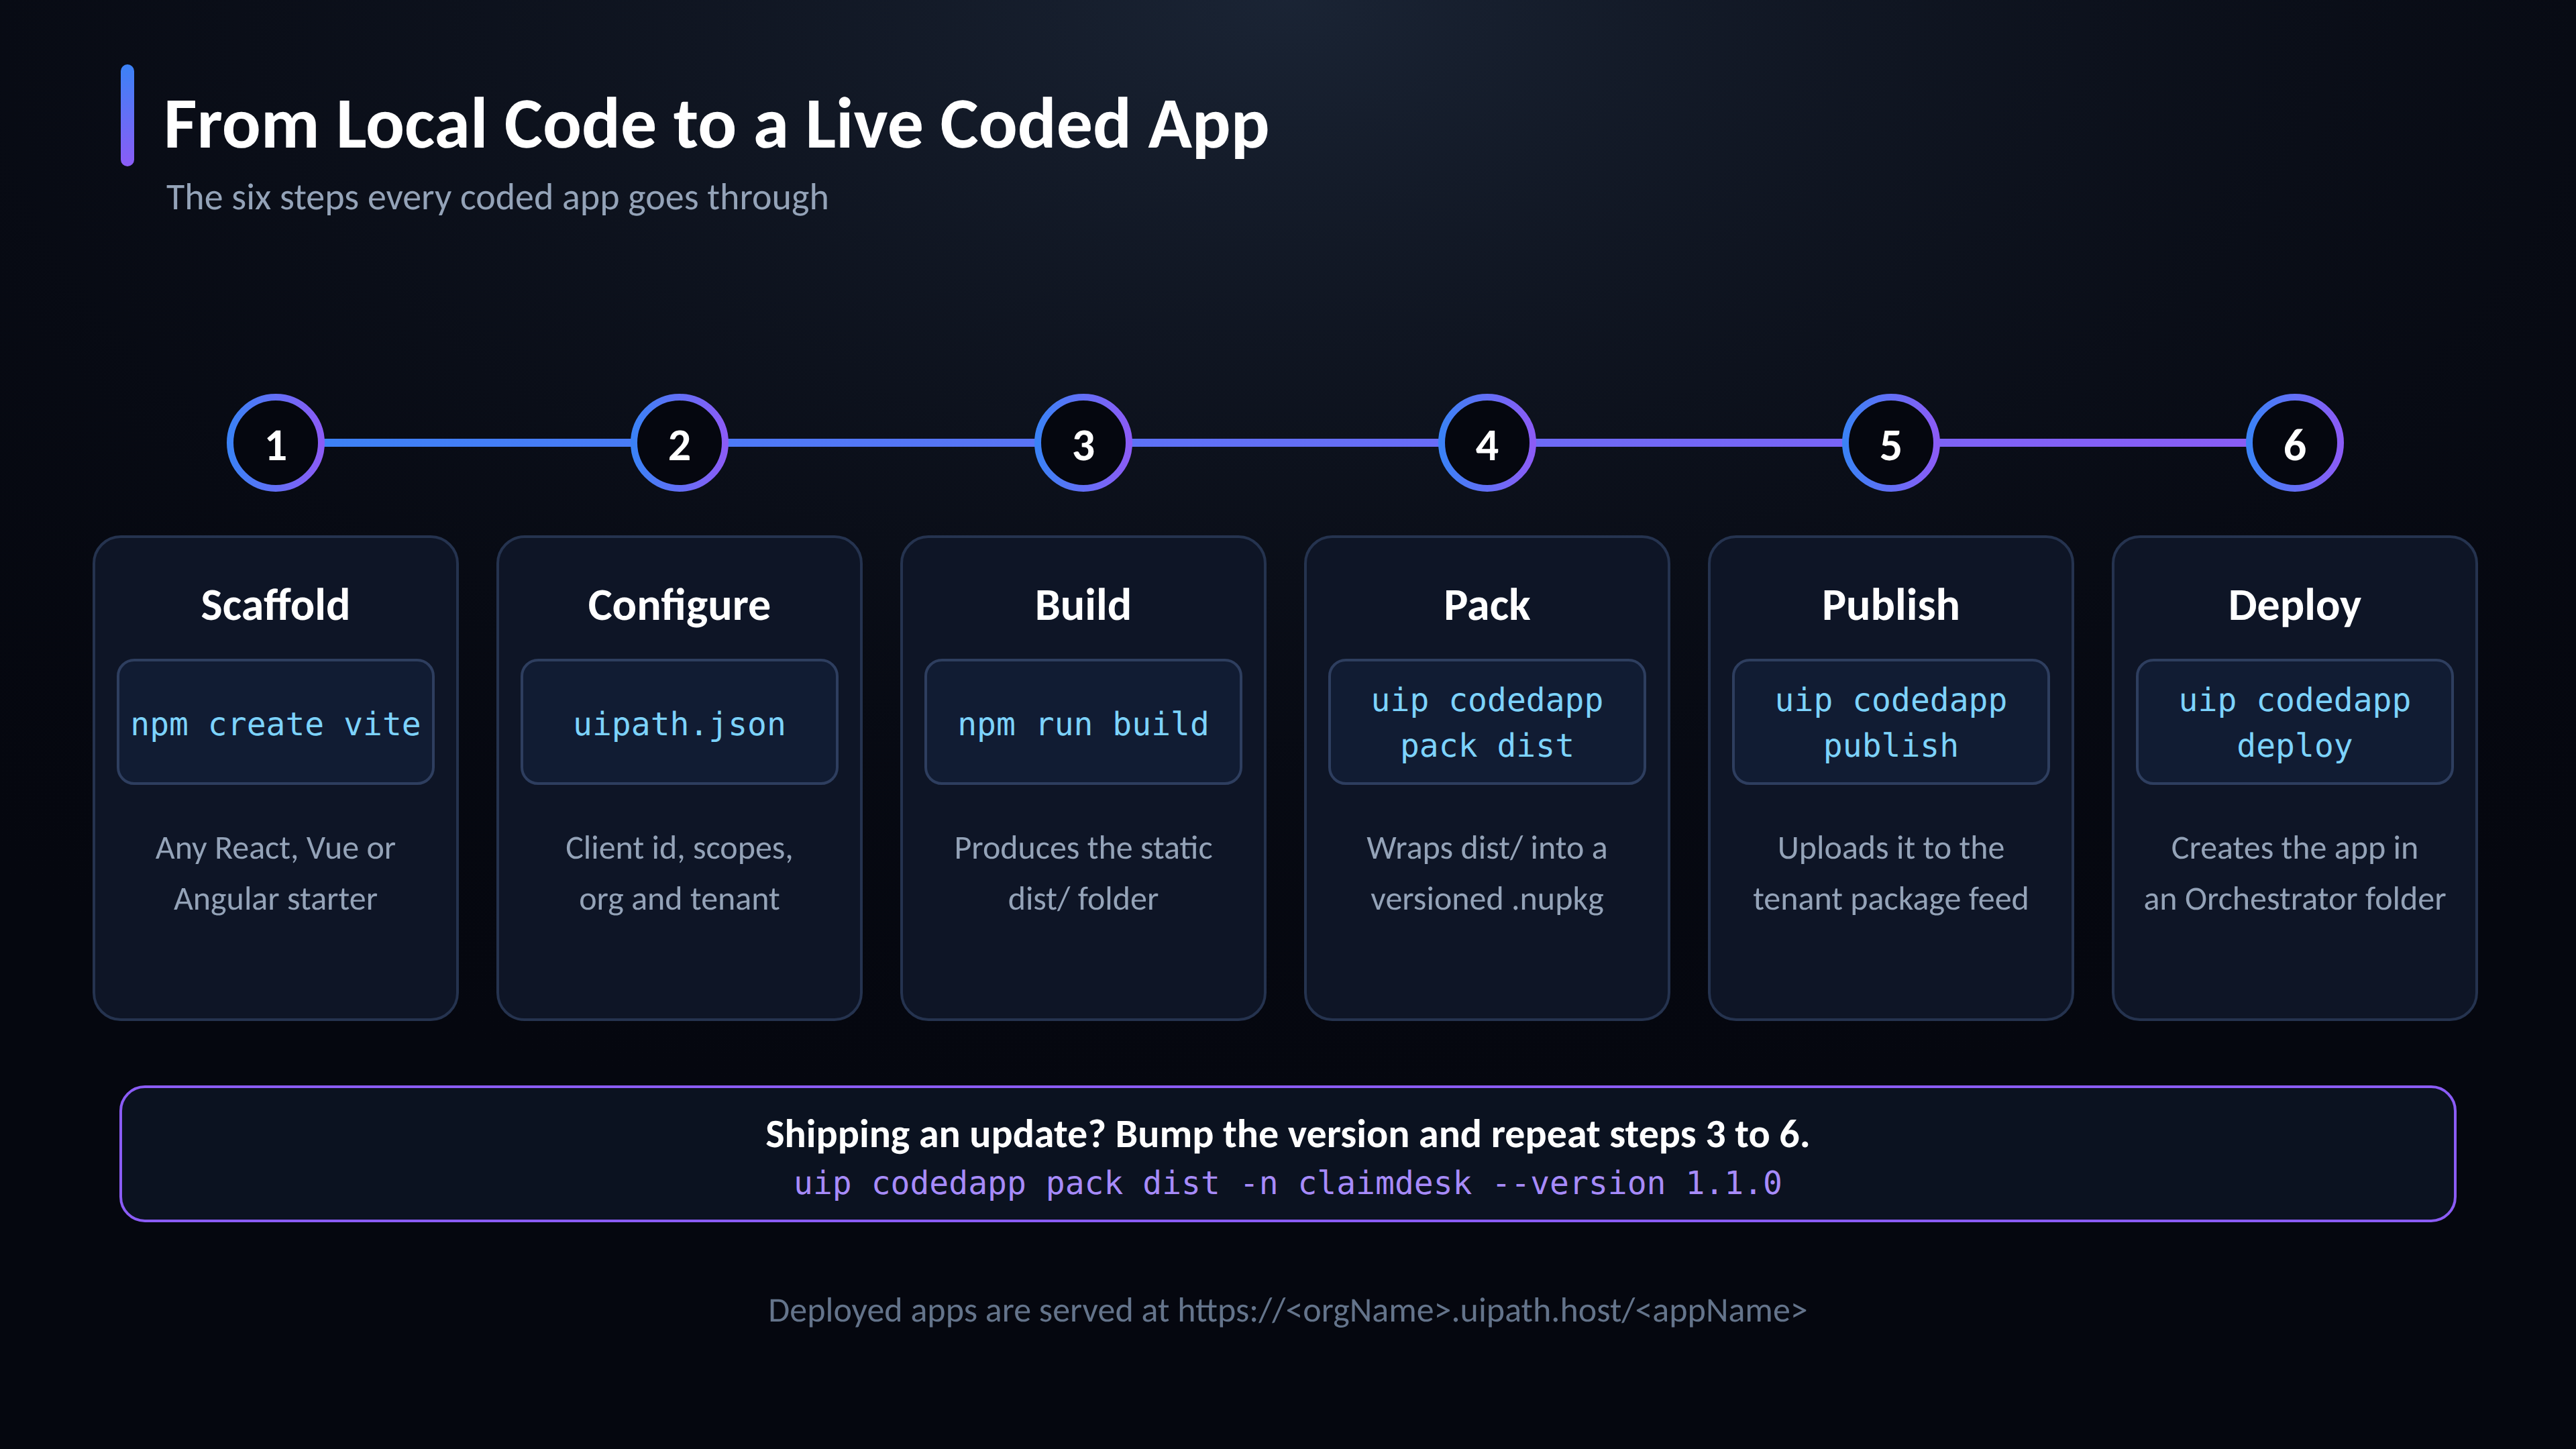

Steps 3 through 6 are the loop you repeat on every release.
First, install the tooling once:
npm install -g @uipath/cli
uip tools install codedapp
Verify what you have — minimum versions have moved as the product evolved, so check the current docs if a command misbehaves:
uip --version      # CLI version
uip tools list     # codedapp tool version
uip tools update   # pull the latest codedapp tool
Then the deploy cycle itself:
uip login -it
npm run build
uip codedapp pack ./dist -n claimdesk --version 1.0.0
uip codedapp publish
uip codedapp deploy
What each command actually does:
| Command | What happens |
|---|---|
uip login -it |
Interactive browser login; lets you pick a tenant from a list |
npm run build |
Your framework's build; produces dist/ |
uip codedapp pack |
Wraps dist/ into .uipath/<name>.<version>.nupkg |
uip codedapp publish |
Uploads the .nupkg to the tenant feed and registers it as an app version |
uip codedapp deploy |
Creates or upgrades the app inside an Orchestrator folder |
A few pack flags worth knowing:
| Flag | Meaning | Default |
|---|---|---|
-n, --name |
Package name | — |
-v, --version |
Package version | 1.0.0 |
-o, --output |
Output directory | ./.uipath |
--main-file |
Entry file | index.html |
--content-type |
webapp, library or process |
webapp |
--dry-run |
Show what would be packaged | — |
Angular users, take note: Angular 17+ outputs to
dist/<project-name>/browser/, while Angular 16 and earlier output todist/<project-name>/. Pointpackat the right one.
Shipping an update is the same loop with a bumped version — deploy auto-detects that it's an upgrade:
npm run build
uip codedapp pack dist -n claimdesk --version 1.1.0
uip codedapp publish
uip codedapp deploy
The CLI keeps a little state for you in two files: .uipath/.auth holds your tokens and org/tenant selection after uip login, and .uipath/app.config.json holds the app's systemName, deployVersion and deploymentId for subsequent runs. Neither belongs in Git.
8. How Configuration Reaches Your App
This section is short but it is the single concept that unlocks everything else. It confused me for an hour, so let me save you that hour.
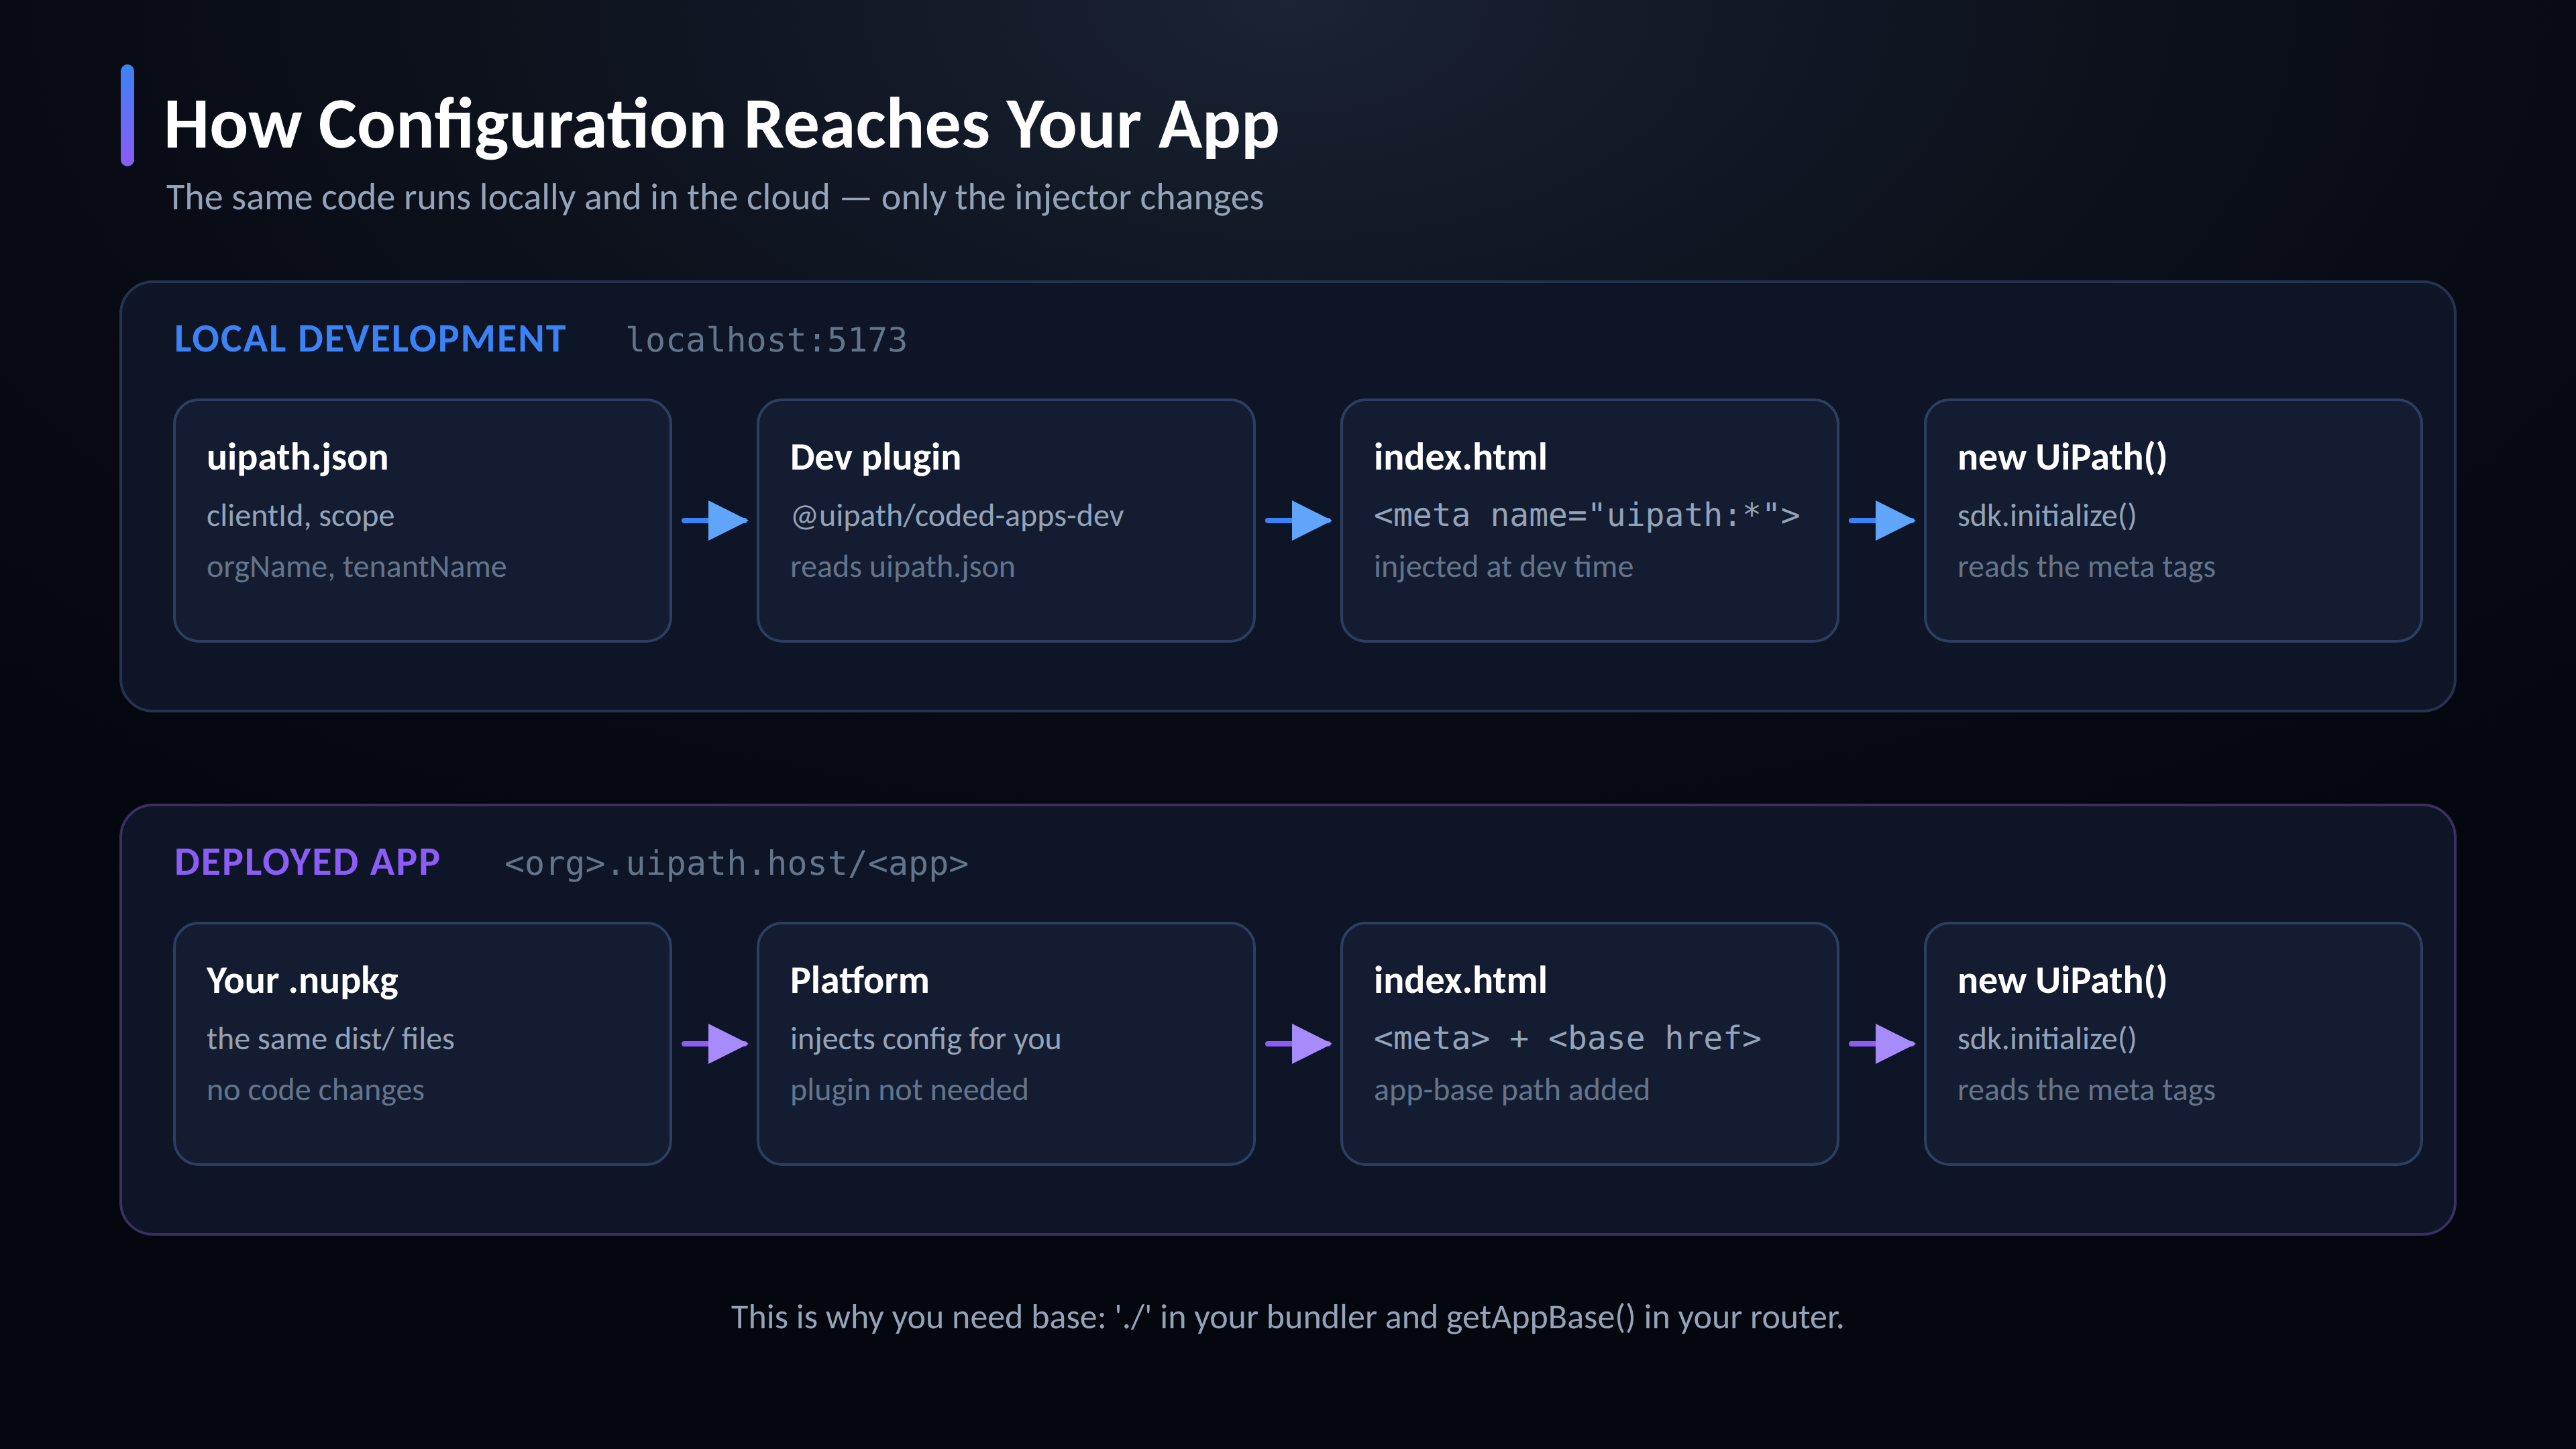

The same new UiPath() call works in both environments because both environments inject the same meta tags.
You write configuration once, in a uipath.json at the project root:
{
  "clientId": "your-oauth-client-id",
  "scope": "your-scopes",
  "orgName": "your-org",
  "tenantName": "your-tenant",
  "baseUrl": "https://api.uipath.com",
  "redirectUri": "http://localhost:5173"
}
| Field | Required | Notes |
|---|---|---|
clientId |
Yes | A non-confidential OAuth client ID from your org |
scope |
No | Defaults to all scopes registered with that client ID |
orgName |
No | Organization name or ID |
tenantName |
No | Tenant name or ID |
baseUrl |
No | Defaults to https://api.uipath.com |
redirectUri |
No | Only needed for local dev |
Locally, a bundler plugin called @uipath/coded-apps-dev reads that file and injects meta tags into your index.html at dev time:
<meta name="uipath:client-id"    content="your-oauth-client-id">
<meta name="uipath:scope"        content="OR.Execution OR.Folders">
<meta name="uipath:org-name"     content="your-org">
<meta name="uipath:tenant-name"  content="your-tenant">
<meta name="uipath:base-url"     content="https://api.uipath.com">
<meta name="uipath:redirect-uri" content="http://localhost:5173">
When deployed, the platform injects those same tags itself — the dev plugin is only for local development — plus two more that change how your app resolves paths:
<meta name="uipath:app-base" content="/your-app-name/">
<base href="/your-app-name/">
That <base href> is the source of nearly every "it worked locally, it's blank in production" bug. Two defences:
1. Relative asset paths. Your bundler must emit relative paths so assets resolve through the injected <base href>:
// vite.config.ts
export default defineConfig({
  base: './',
  plugins: [react(), uipathCodedApps()],
})
Vue CLI users set publicPath: './' instead. And inside JS/TS code, import assets as modules or use import.meta.env.BASE_URL — never a leading slash:
import logo from './assets/logo.svg'                    // ✅
const src = `${import.meta.env.BASE_URL}vite.svg`       // ✅
const src = '/vite.svg'                                 // ❌ breaks when deployed
2. A router basename. If you use client-side routing, feed the router getAppBase(). It reads the injected uipath:app-base tag at runtime and falls back to '/' locally, so it is safe to use unconditionally:
import { getAppBase } from '@uipath/uipath-typescript'
import { BrowserRouter } from 'react-router-dom'

createRoot(document.getElementById('root')!).render(
  <BrowserRouter basename={getAppBase()}>
    {/* your routes */}
  </BrowserRouter>
)
9. Hands-On: Building ClaimDesk
Enough theory. Let's build something real.
ClaimDesk is a small internal app for an insurance-style claims desk. It has two screens:
Upload — staff drop claim PDFs into an Orchestrator storage bucket.
Review — a reviewer browses and edits claim records in a Data Fabric table.
It is deliberately small, but it exercises the pieces you'll use in almost any real app: SDK initialisation, OAuth, file storage, structured data, and the deploy pipeline.
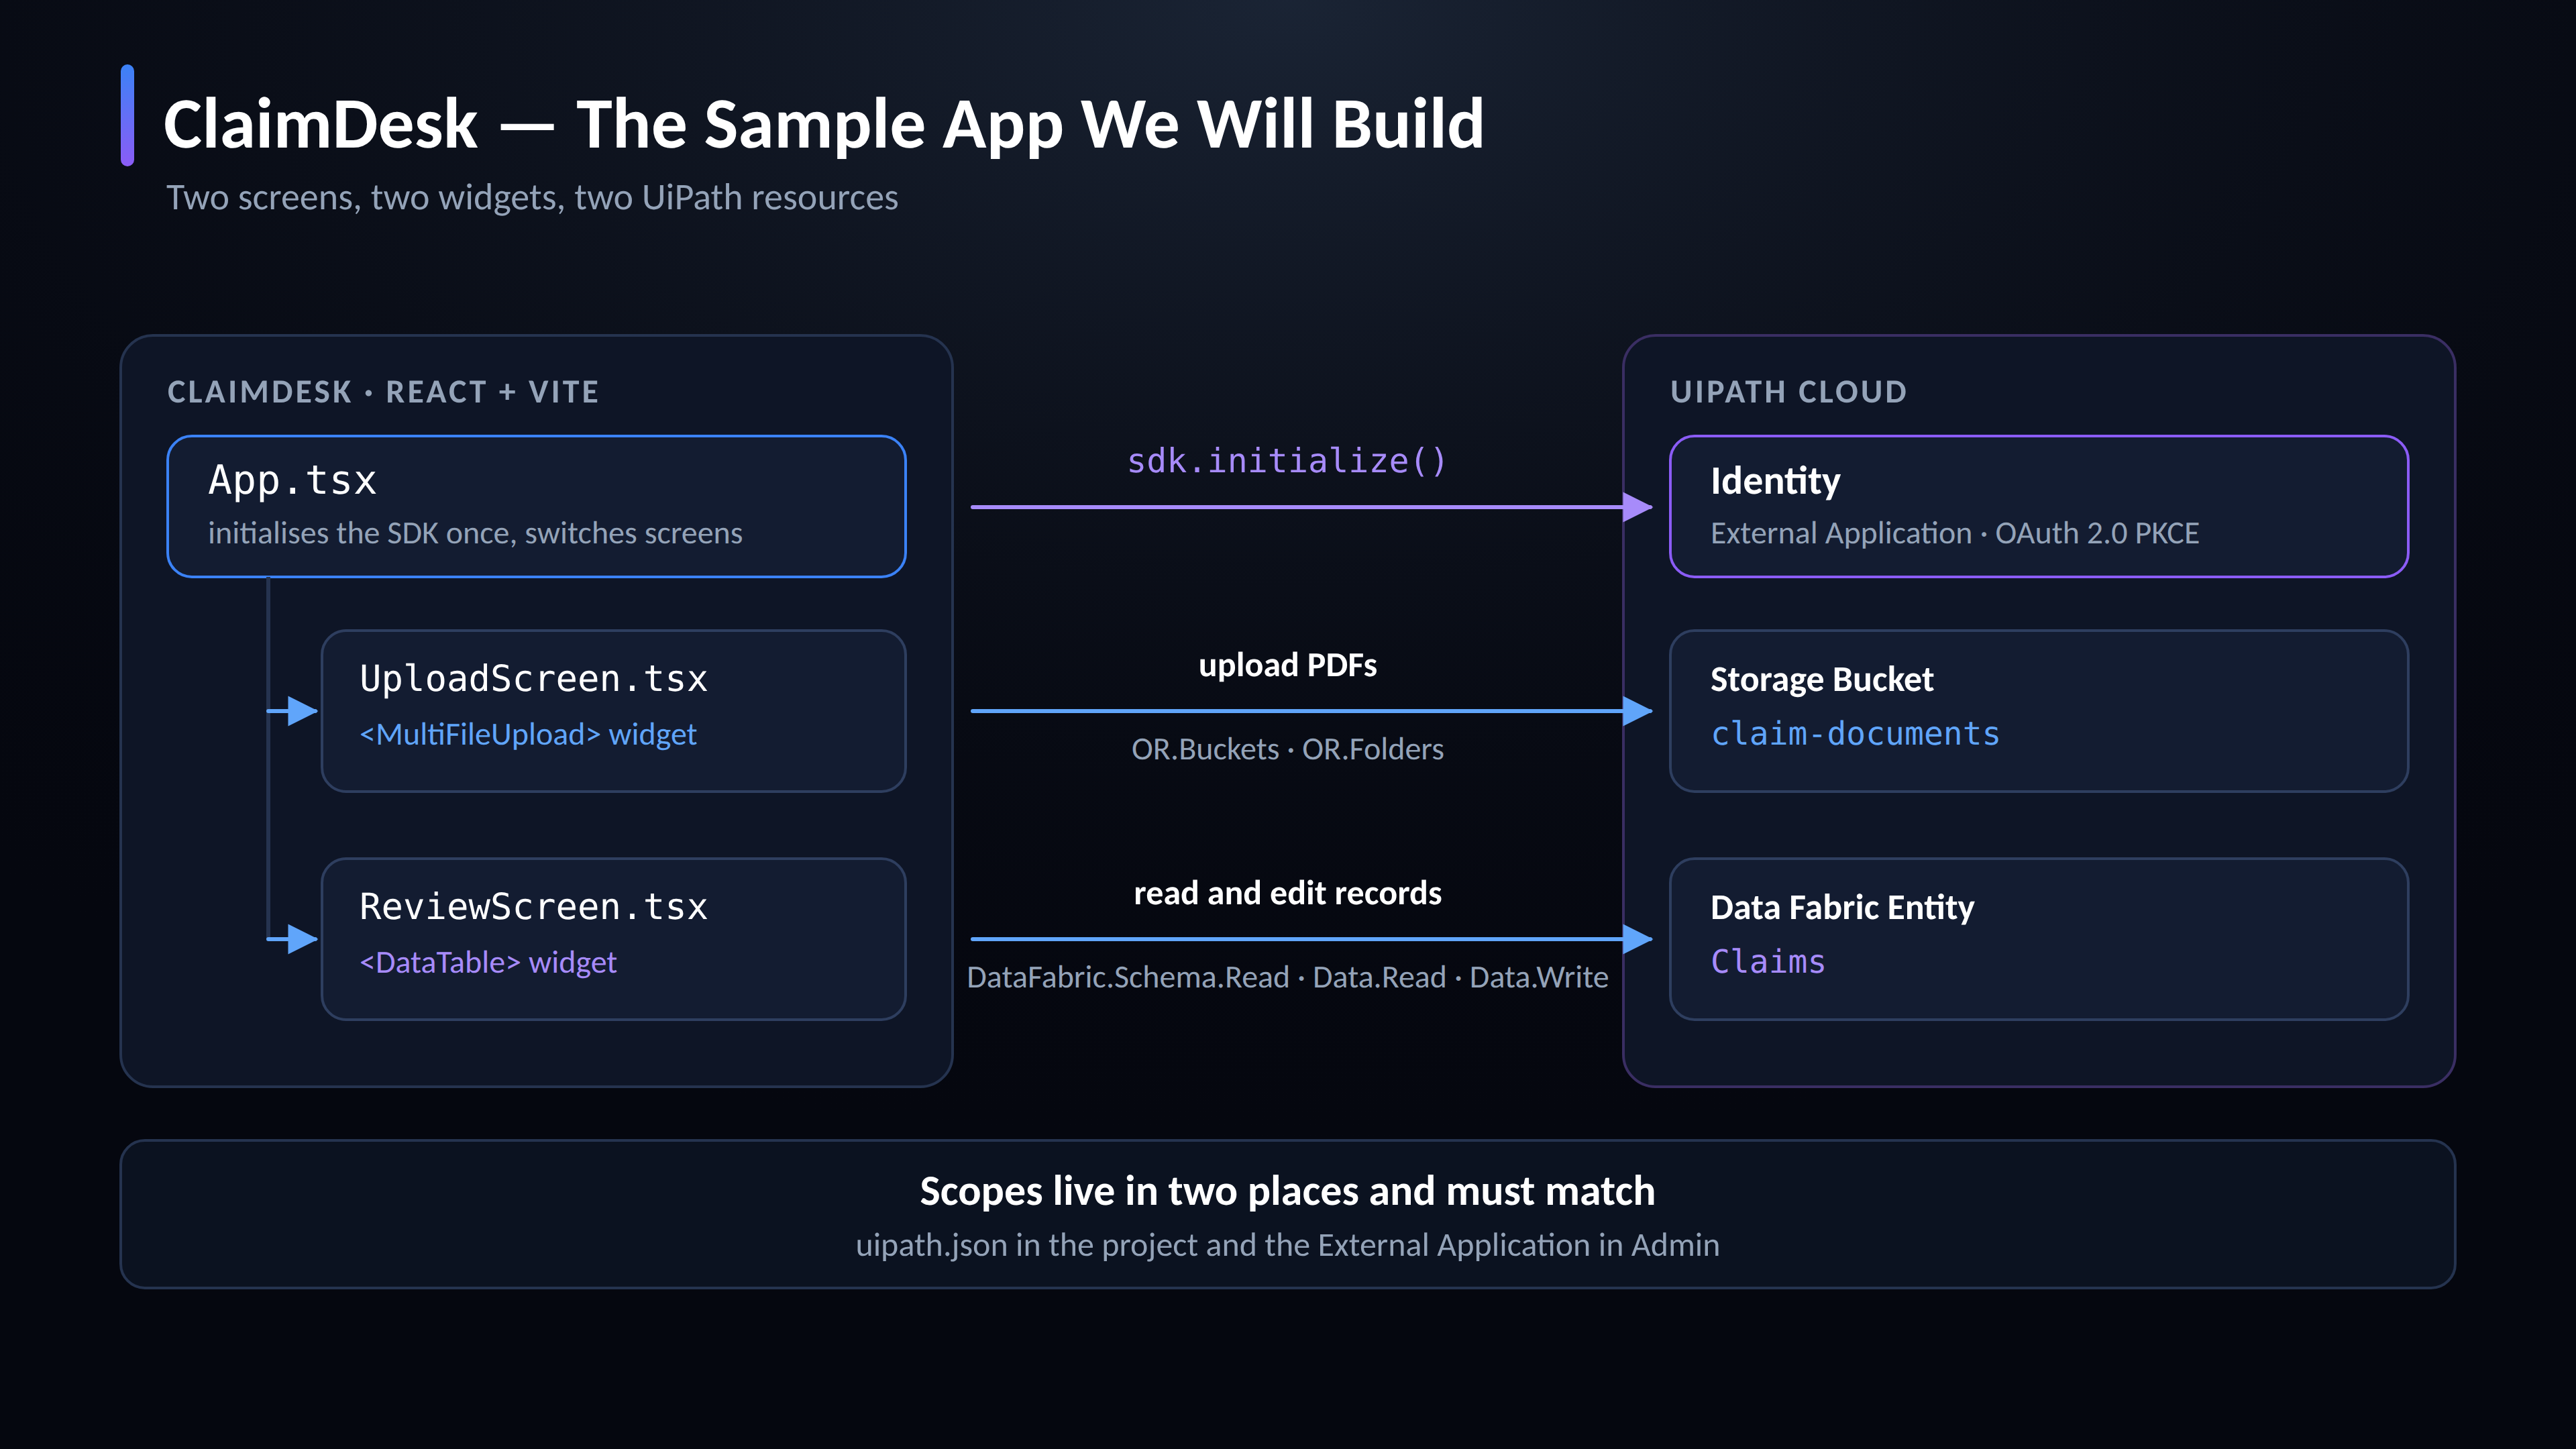

Two screens, two widgets, two UiPath resources. Notice that scopes have to be right in two separate places.
Step 0: Prepare the tenant
Do this first. Almost every failure I hit later traced back to something skipped here.
A. Create a storage bucket. In Orchestrator, create a bucket named claim-documents inside a folder. Note two numbers: the bucket Id and the folder Id.
B. Create a Data Fabric entity. Create an entity named Claims with fields such as:
Id                  (system)
ClaimId             Text
ClaimName           Text
ClaimAmount         Number
ClaimStatus         Text
ClaimSubmittedDate  DateTime
Note its UUID.
C. Register an External Application. Go to Admin → External Applications and create a non-confidential app. Set the redirect URI to http://localhost:5173 for local development, and grant exactly these scopes:
OR.Assets
OR.Buckets
OR.Folders
DataFabric.Schema.Read
DataFabric.Data.Read
DataFabric.Data.Write
This is the step that bites people. Scopes must appear both in your
uipath.jsonand on the External Application. If they're only in one place, consent silently drops them and you get a confusing audience-validation error at runtime.
Step 1: Scaffold the project
npm create vite@latest claimdesk -- --template react-ts
cd claimdesk
Step 2: Install dependencies
npm install @uipath/uipath-typescript \
            @uipath/ui-widgets-multi-file-upload \
            @uipath/ui-widgets-datatable
npm install --save-dev @uipath/coded-apps-dev
Your package.json should end up looking like this:
{
  "name": "claimdesk",
  "private": true,
  "version": "1.0.0",
  "type": "module",
  "scripts": {
    "dev": "vite",
    "build": "tsc --noEmit && vite build",
    "preview": "vite preview"
  },
  "dependencies": {
    "@uipath/ui-widgets-datatable": "^1.0.1",
    "@uipath/ui-widgets-multi-file-upload": "^1.0.0",
    "@uipath/uipath-typescript": "^1.6.2",
    "react": "^19.2.8",
    "react-dom": "^19.2.8"
  },
  "devDependencies": {
    "@types/react": "^19.2.17",
    "@types/react-dom": "^19.2.3",
    "@uipath/coded-apps-dev": "1.0.0-beta.1",
    "@vitejs/plugin-react": "^6.0.4",
    "typescript": "~6.0.2",
    "vite": "^8.2.0"
  }
}
Version note: at the time I built this,
@uipath/ui-widgets-multi-file-upload@1.0.0pinned@uipath/uipath-typescript@1.1.1exactly, which collides with the1.6.2the SDK ships today. If npm refuses to install, runnpm install --legacy-peer-deps. It works at runtime; the conflict is only in the declared peer range. Check the current versions before assuming you need this.
Step 3: Configure uipath.json
Create this at the project root:
{
  "clientId": "<your-external-app-client-id>",
  "scope": "OR.Assets OR.Buckets OR.Folders DataFabric.Schema.Read DataFabric.Data.Read DataFabric.Data.Write",
  "orgName": "<your-org>",
  "tenantName": "<your-tenant>",
  "baseUrl": "https://api.uipath.com",
  "redirectUri": "http://localhost:5173"
}
The scope string must match what you granted on the External Application in Step 0C.
Step 4: Wire up Vite
// vite.config.ts
import { defineConfig } from 'vite'
import react from '@vitejs/plugin-react'
import { uipathCodedApps } from '@uipath/coded-apps-dev/vite'

export default defineConfig({
  base: './',
  plugins: [react(), uipathCodedApps()],
})
Two things are doing work here. uipathCodedApps() injects the config meta tags during local dev. base: './' makes the production build emit relative asset paths so it survives the injected <base href>.
Step 5: The entry point
index.html stays minimal — the plugin adds what it needs:
<div id="root"></div>
<script type="module" src="/src/main.tsx"></script>
And src/main.tsx is the stock Vite mount:
import { StrictMode } from 'react'
import { createRoot } from 'react-dom/client'
import App from './App'

createRoot(document.getElementById('root')!).render(
  <StrictMode>
    <App />
  </StrictMode>,
)
ClaimDesk has only two screens, so I skipped a router entirely and used conditional rendering. If you add react-router-dom later, remember basename={getAppBase()}.
Step 6: App.tsx — initialise once, switch screens
This is the most important file in the project, and two lines of it are hard-won:
import { useEffect, useState } from 'react'
import { UiPath, telemetryClient, trackEvent } from '@uipath/uipath-typescript/core'
import UploadScreen from './screens/UploadScreen'
import ReviewScreen from './screens/ReviewScreen'

// multi-file-upload@1.0.0 was built against uipath-typescript@1.1.x, where
// telemetryClient exposed .track(); 1.6.x moved that to trackEvent(), so the
// widget throws "telemetryClient.track is not a function" on upload.
// Alias it back. Drop this once the widget ships a build for >= 1.4.
;(telemetryClient as unknown as { track?: typeof trackEvent }).track ??= trackEvent

// Widgets read the body theme class ('light' | 'dark') at runtime.
const THEME: 'light' | 'dark' = 'light'

const sdk = new UiPath()

// Call initialize() exactly once. The OAuth code is single-use, so React
// StrictMode's double-invoked effect (or HMR) would exchange it twice and
// the second attempt fails with invalid_grant.
let initOnce: Promise<void> | null = null
const initSdk = () =>
  (initOnce ??= sdk.isInitialized() ? Promise.resolve() : sdk.initialize())

type Screen = 'upload' | 'review'

function App() {
  const [ready, setReady] = useState(false)
  const [error, setError] = useState<string | null>(null)
  const [screen, setScreen] = useState<Screen>('upload')

  useEffect(() => {
    document.body.classList.add(THEME)
    initSdk()
      .then(() => setReady(true))
      .catch((e) => setError(e instanceof Error ? e.message : 'SDK init failed'))
  }, [])

  if (error) return <main><p role="alert">Sign-in failed: {error}</p></main>
  if (!ready) return <main><p role="status">Signing in…</p></main>

  return (
    <main>
      <h1>ClaimDesk</h1>
      <nav>
        <button type="button" onClick={() => setScreen('upload')} disabled={screen === 'upload'}>Upload</button>
        <button type="button" onClick={() => setScreen('review')} disabled={screen === 'review'}>Review</button>
      </nav>
      {screen === 'upload' ? (
        <UploadScreen sdk={sdk} onUploaded={() => setScreen('review')} />
      ) : (
        <ReviewScreen sdk={sdk} />
      )}
    </main>
  )
}

export default App
Two notes on the tricky bits:
The module-level initOnce singleton. React StrictMode intentionally double-invokes effects in development. The OAuth authorization code is single-use, so the second initialize() tries to redeem an already-spent code and fails with invalid_grant. Guarding at module scope — not inside the component — is what fixes it, because the guard has to survive remounts.
The theme class. The widgets read light or dark off the <body> element. Forget it and they render nearly invisible.
Step 7: UploadScreen.tsx
import { useState } from 'react'
import type { UiPath } from '@uipath/uipath-typescript/core'
import { MultiFileUpload } from '@uipath/ui-widgets-multi-file-upload'
import '@uipath/ui-widgets-multi-file-upload/MultiFileUpload.css'

// ─── ClaimDesk config — edit for your tenant ──────────────────────────
// Orchestrator Storage Bucket named "claim-documents": its numeric Id.
const BUCKET_ID = 133506
// Numeric Id of the Orchestrator folder that contains that bucket.
const BUCKET_FOLDER_ID = 1012669
// Path prefix applied to every uploaded file inside the bucket.
const UPLOAD_PATH = 'claim-documents/'
// Accepted file types.
const ACCEPT = '.pdf'
// ──────────────────────────────────────────────────────────────────────

export default function UploadScreen({
  sdk,
  onUploaded,
}: {
  sdk: UiPath
  onUploaded: () => void
}) {
  const [msg, setMsg] = useState<{ ok: boolean; text: string } | null>(null)

  return (
    <section>
      <h2>Upload claim documents</h2>
      <MultiFileUpload
        sdk={sdk}
        bucketId={BUCKET_ID}
        folderId={BUCKET_FOLDER_ID}
        path={UPLOAD_PATH}
        accept={ACCEPT}
        onUploadSuccess={(files) => {
          setMsg({ ok: true, text: `Uploaded ${files.length} file(s).` })
          onUploaded()
        }}
        onUploadError={(err) => setMsg({ ok: false, text: err.message })}
      />
      {msg && (
        <p role="status" style={{ color: msg.ok ? 'green' : 'crimson' }}>
          {msg.text}
        </p>
      )}
    </section>
  )
}
That's the entire upload feature. Drag-and-drop, progress, multi-file, direct-to-bucket, error handling — from one component. Replace BUCKET_ID and BUCKET_FOLDER_ID with your own numbers from Step 0A.
Step 8: ReviewScreen.tsx
import type { UiPath } from '@uipath/uipath-typescript/core'
import { DataTable } from '@uipath/ui-widgets-datatable'
import '@uipath/ui-widgets-datatable/DataTable.css'

// ─── ClaimDesk config — edit for your tenant ──────────────────────────
// UUID of the Data Fabric entity "Claims" (fields: Id, ClaimId, ClaimName,
// ClaimAmount, ClaimStatus, ClaimSubmittedDate). Browse/edit grid.
const CLAIM_ENTITY_ID = '0526158c-2fa5-f111-9b33-6045bda94b17'
// ──────────────────────────────────────────────────────────────────────

export default function ReviewScreen({ sdk }: { sdk: UiPath }) {
  return (
    <section>
      <h2>Review claims</h2>
      <div style={{ height: 480 }}>
        <DataTable sdk={sdk} entityId={CLAIM_ENTITY_ID} pageSize={25} showIdColumn />
      </div>
    </section>
  )
}
Four props and you have a sortable, filterable, inline-editable grid over a Data Fabric entity. The widget reads the entity schema at runtime, so if you add a column in Data Fabric it appears here without a code change.
The
<div style={{ height: 480 }}>wrapper is not optional. The grid needs a bounded height from its parent or it collapses to zero.
Step 9: The final project structure
claimdesk/
├── index.html
├── package.json
├── tsconfig.json
├── vite.config.ts
├── uipath.json               ← OAuth + tenant config
└── src/
    ├── main.tsx              ← React mount
    ├── App.tsx               ← SDK init + screen switch
    └── screens/
        ├── UploadScreen.tsx  ← <MultiFileUpload>
        └── ReviewScreen.tsx  ← <DataTable>
The runtime path is straightforward: index.html → src/main.tsx → src/App.tsx → one of the two screens.
Here's the tsconfig.json I used:
{
  "compilerOptions": {
    "target": "ES2023",
    "lib": ["ES2023", "DOM", "DOM.Iterable"],
    "module": "ESNext",
    "moduleResolution": "Bundler",
    "jsx": "react-jsx",
    "strict": true,
    "skipLibCheck": true,
    "noEmit": true,
    "types": ["vite/client"]
  },
  "include": ["src"]
}
skipLibCheck: true matters here — it stops the duplicated SDK type definitions from the peer-dependency mismatch from failing your build.
And a .gitignore:
node_modules/
dist/
.uipath/
*.local
Step 10: Run it locally
npm run dev
Open http://localhost:5173. You should get redirected to UiPath sign-in, consent to the scopes once, and land back on the Upload screen.
If you see invalid_grant on that first load, reload from a clean http://localhost:5173 with no ?code= or ?iss= left in the URL.
Step 11: Build, pack, publish, deploy
# 1. Build the static bundle
npm run build

# 2. Log in to your tenant
uip login -it

# 3. Package dist/ into a .nupkg
uip codedapp pack dist -n claimdesk --version 1.0.0

# 4. Upload it to the tenant feed
uip codedapp publish

# 5. Create the app in an Orchestrator folder
uip codedapp deploy -n claimdesk --folder-key <FOLDER-GUID>
Your app is now live at:
https://<orgName>.uipath.host/claimdesk
One last thing before you share the link: add the deployed URL as a redirect URI on your External Application, alongside the localhost one. And if a colleague reports "User does not exist in any organization" when they open it, that just means they aren't a member of the org where the app is deployed — invite them, have them accept, and it resolves.
10. Things That Bit Me
I'll be honest about the friction, because the tutorials never are.
| Symptom | Cause | Fix |
|---|---|---|
Failed to get access token: invalid_grant on load |
StrictMode double-invokes the init effect and the single-use OAuth code is redeemed twice | Guard initialize() with a module-level singleton, as in App.tsx above |
telemetryClient.track is not a function on upload |
The widget was built against an older SDK telemetry API | Alias telemetryClient.track to trackEvent at module load |
IDX10214: Audience validation failed in the grid |
The access token lacks Data Fabric scope, so its audience is wrong for the Entities API | Add DataFabric.* scopes to both uipath.json and the External Application, then clear site data and re-consent |
| npm refuses to install | A widget pins an exact older SDK version | npm install --legacy-peer-deps |
| Blank page after deploy, 404s on JS/CSS | Missing base: './' in the bundler |
Set it, rebuild, re-pack with a bumped version |
| Routes 404 after deploy but work locally | Router has no basename | basename={getAppBase()} |
| Widgets render nearly invisible | No theme class on <body> |
document.body.classList.add('light') |
Build fails but npm run dev worked |
A TypeScript error dev never type-checked |
Fix the first error from npm run build |
None of these are conceptual problems. They are the ordinary friction of a young toolchain, and every one has a one-line fix. But knowing them in advance is worth an afternoon.
11. Coded Web Apps vs Coded Action Apps
There is a second flavour worth knowing about, because it solves a different problem with the same tools.
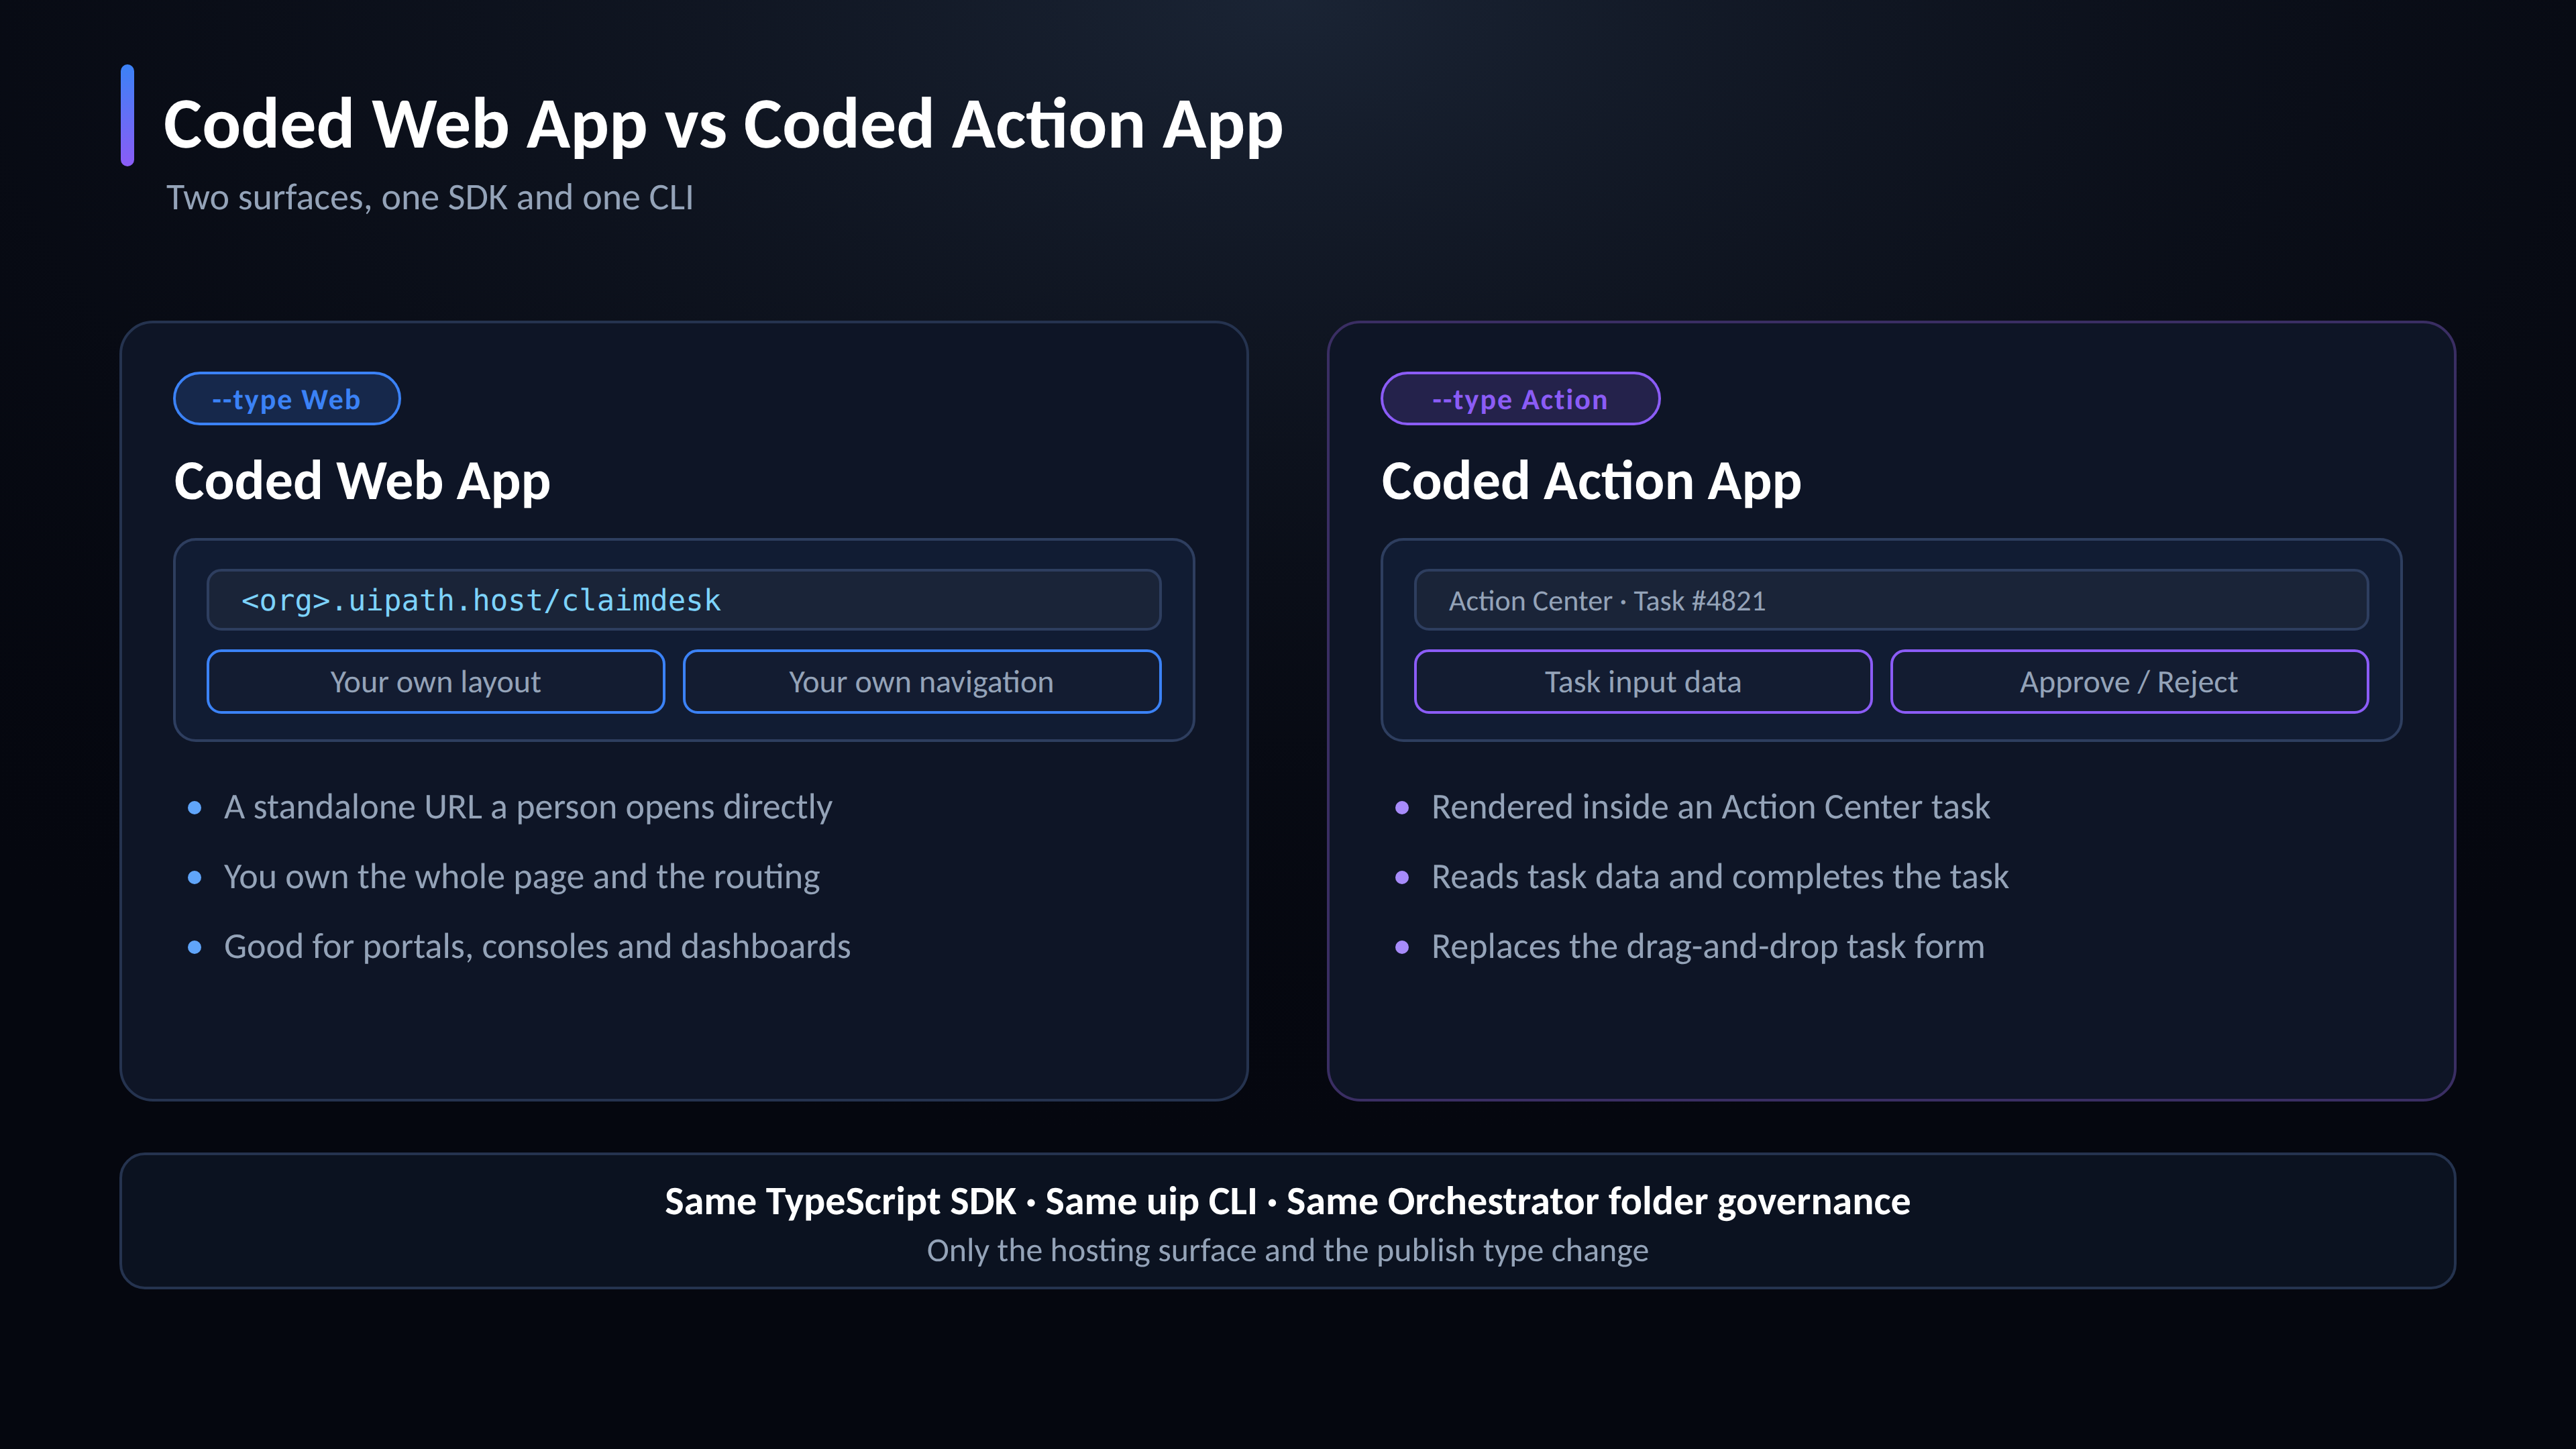

Same SDK, same CLI, same governance. Only the hosting surface and the publish type differ.
A Coded Action App extends Action Center by letting you build a custom React or Angular application and use it as the user interface for Action Center tasks. Before this existed, task interfaces could only be created through the App Designer in Studio Web or UiPath App Studio.
Why this matters: human-in-the-loop steps are where automation meets judgement, and judgement needs context. A Coded Action App can surface information from other UiPath services directly inside the task — pull the customer's history, show the source document, chart the last six invoices — so the person deciding has what they need in one place.
The differences in practice:
| Coded Web App | Coded Action App | |
|---|---|---|
| Where it lives | Its own URL at <org>.uipath.host/<app> |
Rendered inside an Action Center task |
| How it's opened | A person navigates to it | A task is assigned and opened |
| Data flow | Whatever you query via the SDK | Task input data in, task completion out |
| Publish flag | --type Web (the default) |
--type Action |
| Frameworks | React, Vue, Angular, plain JS | React or Angular |
A known limitation: Coded Action Apps that use an external application to call other UiPath services via the TypeScript SDK fail to authenticate in Assistant (Desktop). Authentication works as expected only in Assistant (Web).
12. Security and Governance
A Coded App runs in the user's browser with a token scoped to their permissions. That is a good default, but it puts a few things squarely on you.
Everything client-side is public. Your bundled JavaScript ships to the browser. Bucket IDs and entity UUIDs in it are fine — they're identifiers, not credentials. Anything genuinely secret belongs in Orchestrator Assets or behind a process, never in your source.
Use a non-confidential client for the app itself. There is no client secret in a browser app, which is exactly why the flow is authorization-code + PKCE. Keep confidential apps for CI/CD, where the secret lives in a pipeline vault.
Grant the narrowest scopes that work. OR.Buckets.Read instead of OR.Buckets if you never upload. DataFabric.Data.Read without Write for a read-only console. The scope list is the app's blast radius; it's worth being fussy about.
Start read-only. My habit is to ship version 1.0 with read scopes only, confirm the shape of the data and the access patterns, then add write scopes deliberately. It costs a day and it has saved me from embarrassment more than once.
Version every deploy. pack takes an explicit --version for a reason. Meaningful versions give you a rollback story: publish the previous version, deploy it, done.
Let the platform do the authorisation. Resist the temptation to build your own role logic in React. Deploy the app into the right Orchestrator folder and let folder roles decide who gets in. A permission model that lives in two places will drift, and the copy in your JavaScript is the one an attacker can read.
13. Final Thoughts
What changed for me was not the technology — it's a React app calling REST APIs, which is not new. What changed was the removal of a false choice.
For years the decision was: use the visual designer and accept its limits, or build it properly outside the platform and inherit hosting, auth and governance as your problem. Coded Apps make that a false dichotomy. You get the developer experience you already have, and the platform still owns identity, hosting and permissions.
If you're going to try it, here is the order I'd suggest:
1. Build something tiny first — one screen, one entity, read-only
2. Get it deployed before you make it pretty
3. Add write operations only after read works end to end
4. Reach for the UI widgets before building your own
5. Put it in Git and wire up CI early, while the project is small
6. Keep the app thin — business logic belongs in processes and agents
That last point deserves emphasis. The temptation with a real programming language in hand is to put logic in the app. Resist it. A Coded App should be a good window onto the automation platform, not a second implementation of it. Validation rules, approval chains, retries and orchestration belong in processes, agents and Maestro — where they can be governed, monitored and reused. The app's job is to render, collect and hand off.
Get that boundary right and Coded Apps become what they should be: the layer where people meet the automation, built with the same care as everything else you ship.
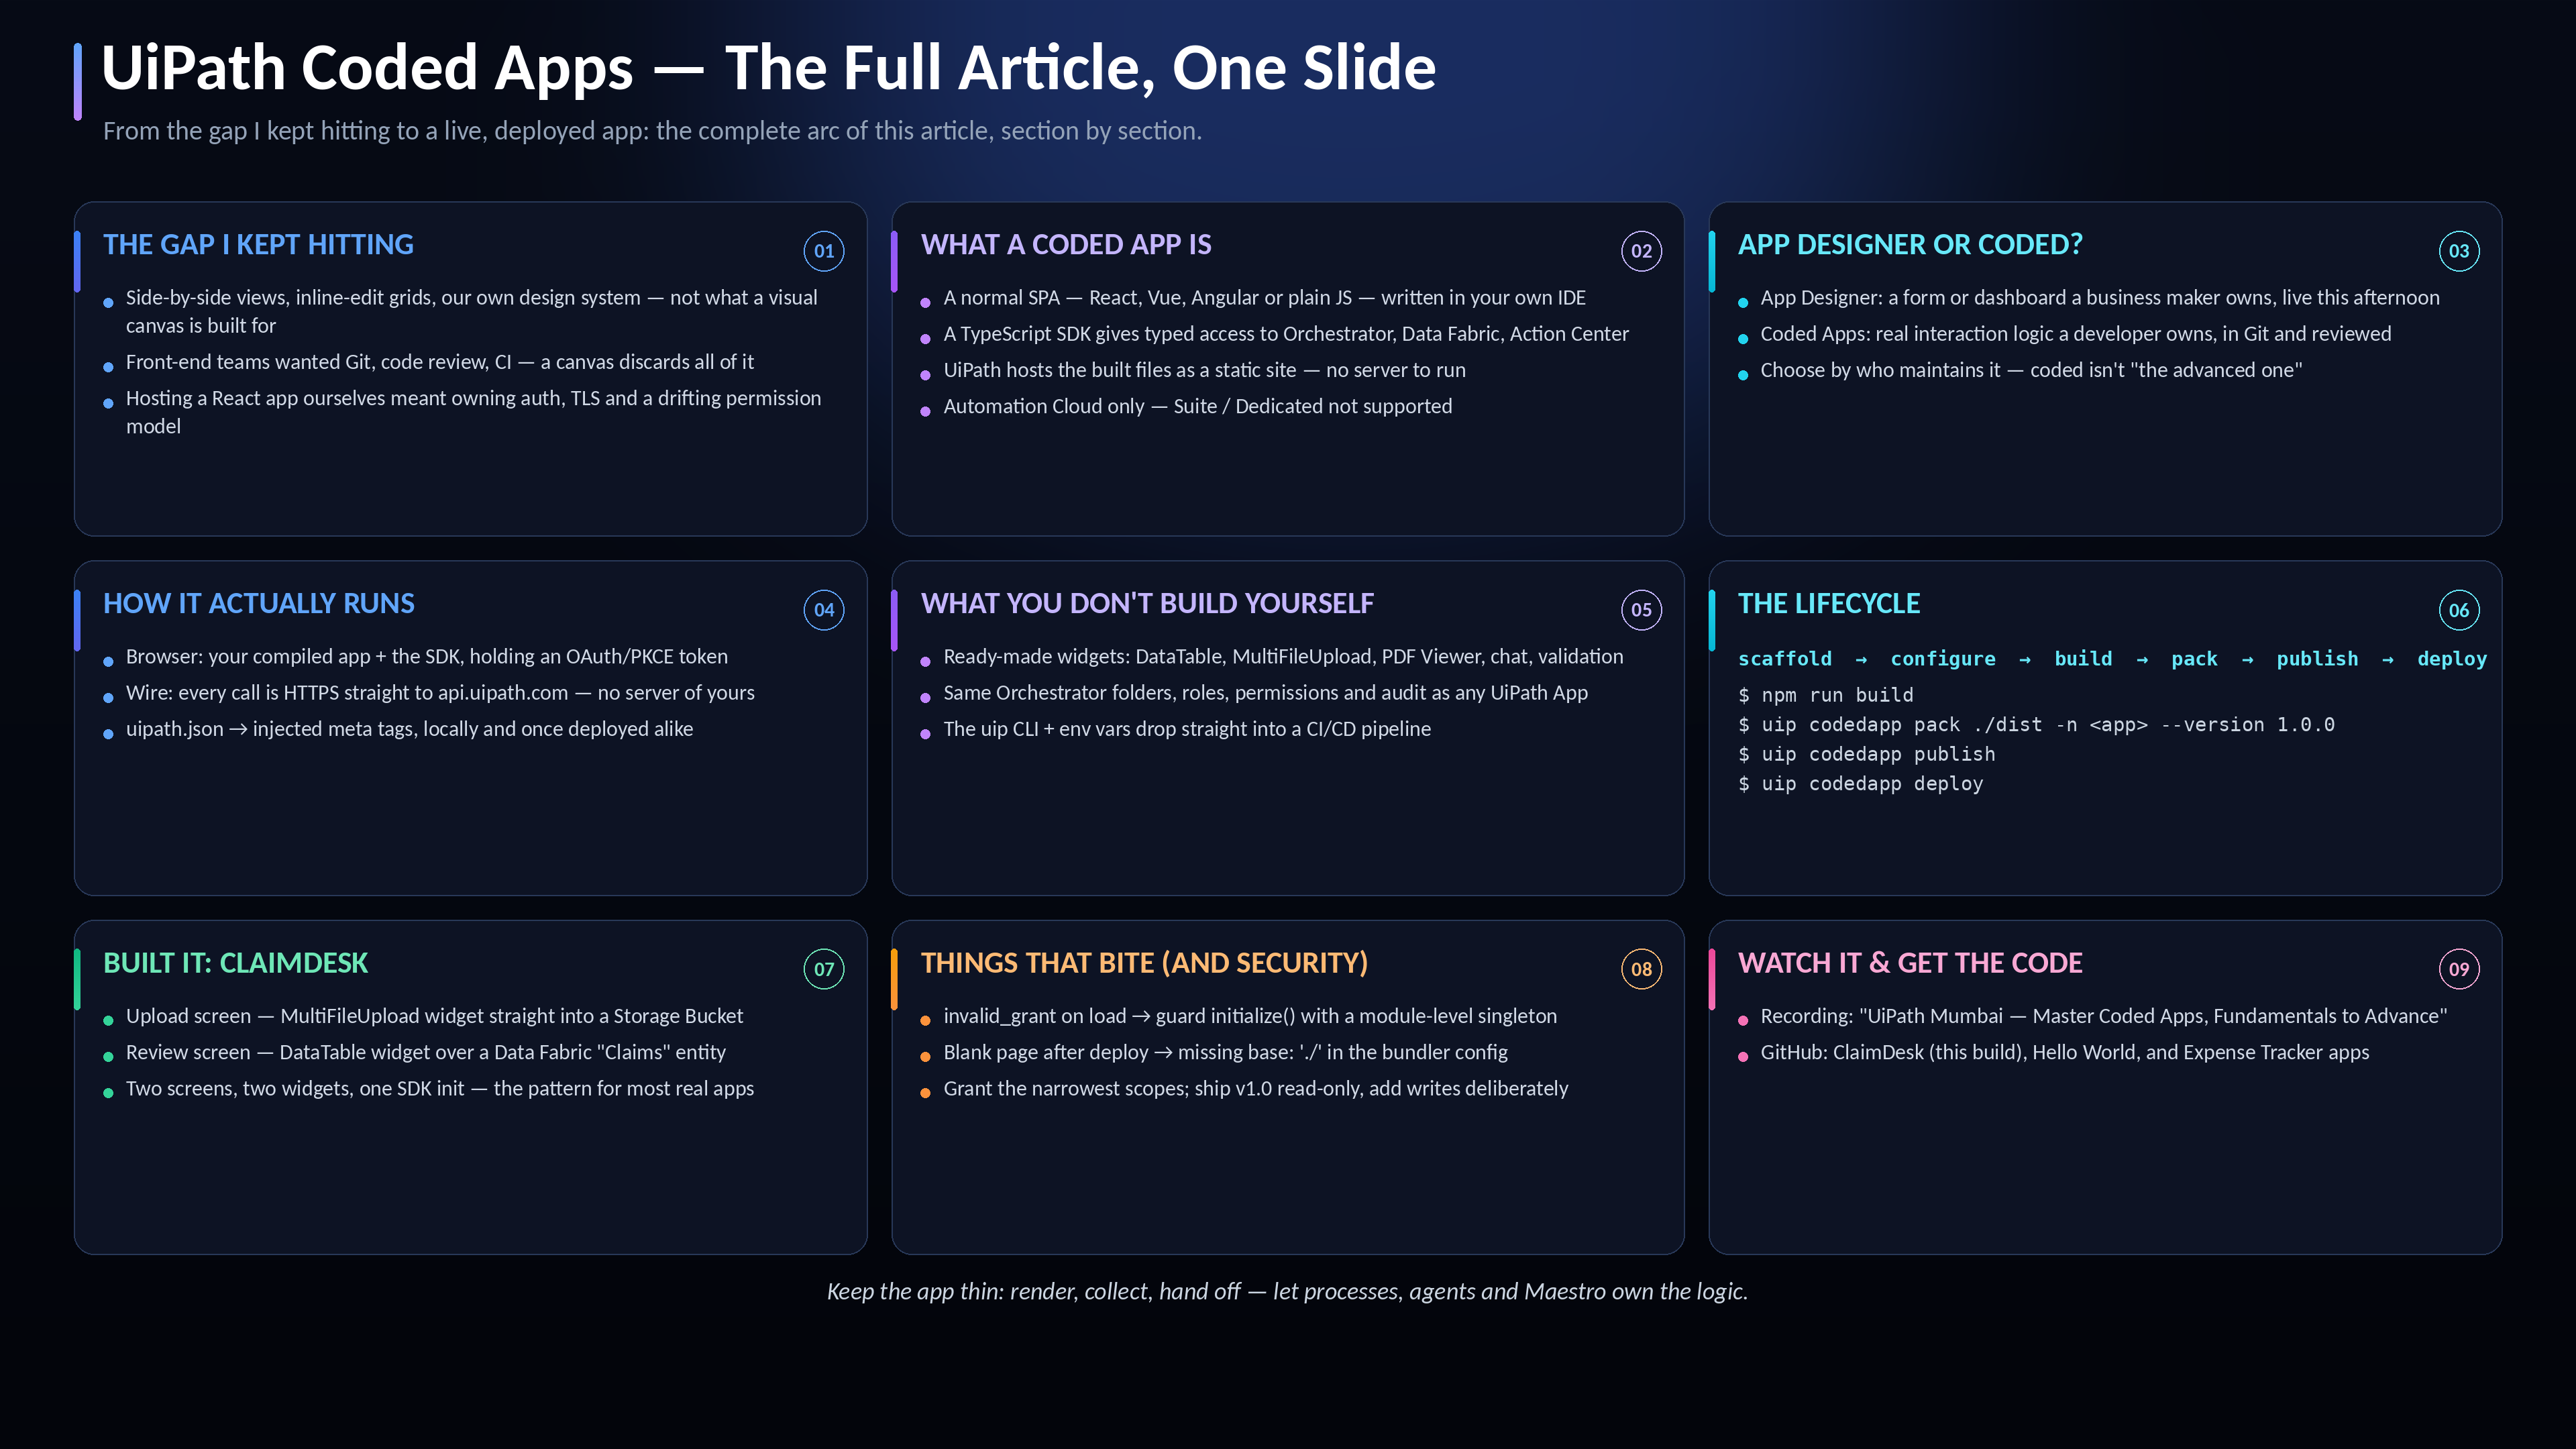
Visual Summary
14. Watch the Session and Grab the Code
I covered this same walkthrough live at the UiPath Mumbai community event, "Master Coded Apps: From Fundamentals to Advance." If you'd rather watch it built step by step than read it, the session recording is here:
And the full ClaimDesk source from this article is on GitHub:
Two more Coded Apps you can browse for additional patterns:
Hello World App — the smallest possible Coded App, good for seeing the SDK init and deploy loop with nothing else in the way
Expense Tracker App — a second real-world example, with its own take on structuring screens around Data Fabric
References
About Coded Apps — product overview and network requirements
Coded Apps: Getting Started —
uipath.json, the dev plugin, the pre-deployment checklistCoded Apps CLI Reference —
login,pack,publish,deploy, environment variablesOAuth Scopes Reference — the scope required by every SDK method
UiPath/uipath-typescript — the SDK and its
samples/directoryUiPath/uipath-ui-widgets — DataTable, MultiFileUpload, PDF viewer, Validation Station and more
-